Sushi Cakes are whole savory cakes made from sushi rice layered with a variety of sashimi and everything from ikura to avocado, shiso leaves, and cucumbers. They are very popular in Hawaii, especially at potluck parties and family gatherings. People also love sushi cakes in place of a traditional birthday cake! Here's everything you need to know about sushi cakes, including a recipe to make your own at home! Slice, eat, and enjoy ^_^
What Is Sushi Cake?
Hello, Sushi Cake! Have you heard about sushi cakes? They started getting popular in Hawaii a few years ago...and then they really took off last year.
At first I thought sushi cakes would be a fleeting trend, but it looks like sushi cakes are here to stay. And that is a great thing!

A sushi cake is a whole cake...made out of sushi! It's not a bunch of sushi pieces all stacked together. But it has all the components of sushi, assembled into the form of cake.

I love sushi cake so much, and it seems like everyone else does as well. It is so fun to look at and even more onolicious to eat and enjoy.
Sushi cake is playful and doesn't take itself too seriously, but most importantly it is delicious. You'll have everyone oohhing and ahhing if you show up to to a party with sushi cake.
Components of Sushi Cake
What exactly goes into a sushi cake?
Foundation
The foundation of a sushi cake is sushi rice. The rice is layered with popular sushi roll ingredients like spicy tuna, avocado, and crab salad. Think one layer sushi rice, topped with one layer of spicy tuna, topped with another layer of sushi rice, layer of avocado and furikake, layer of sushi rice, layer of crab salad, etc.
Sashimi Frosting
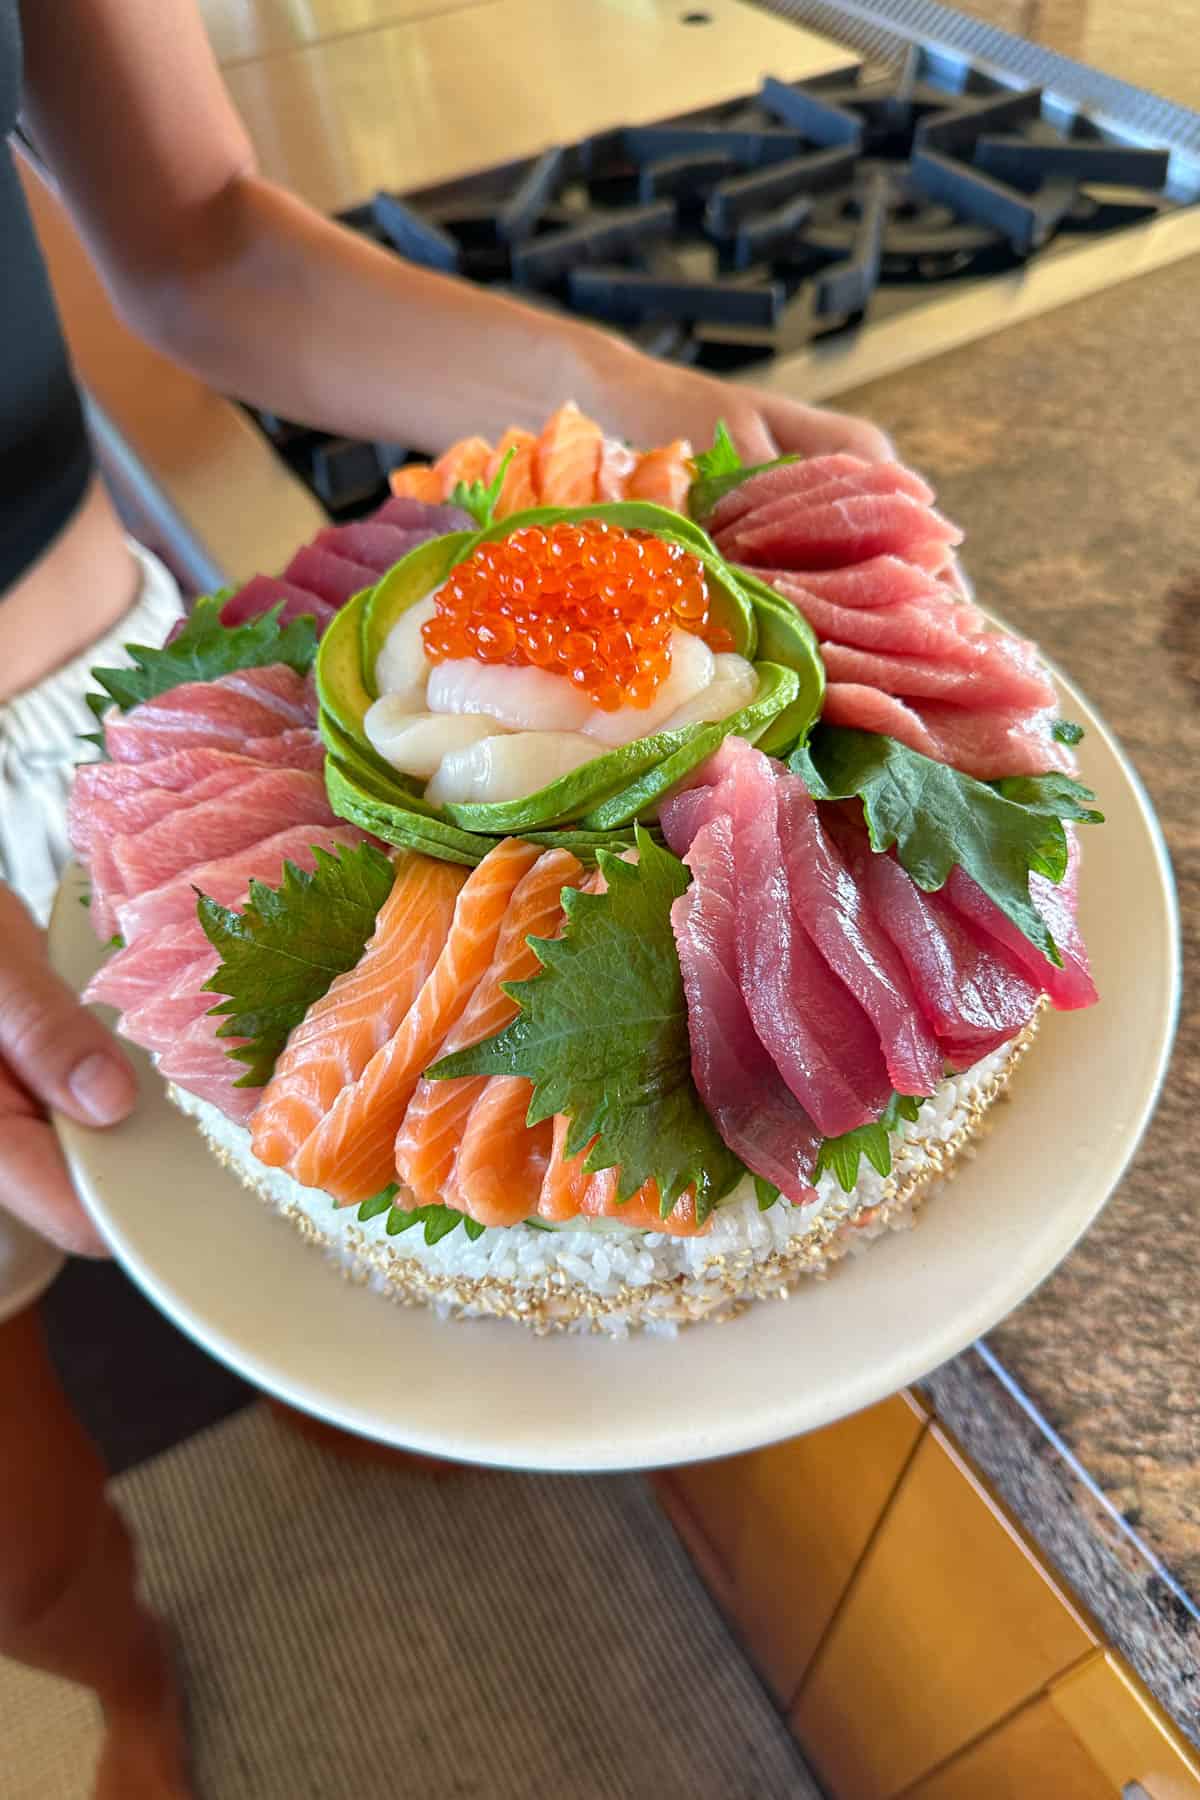
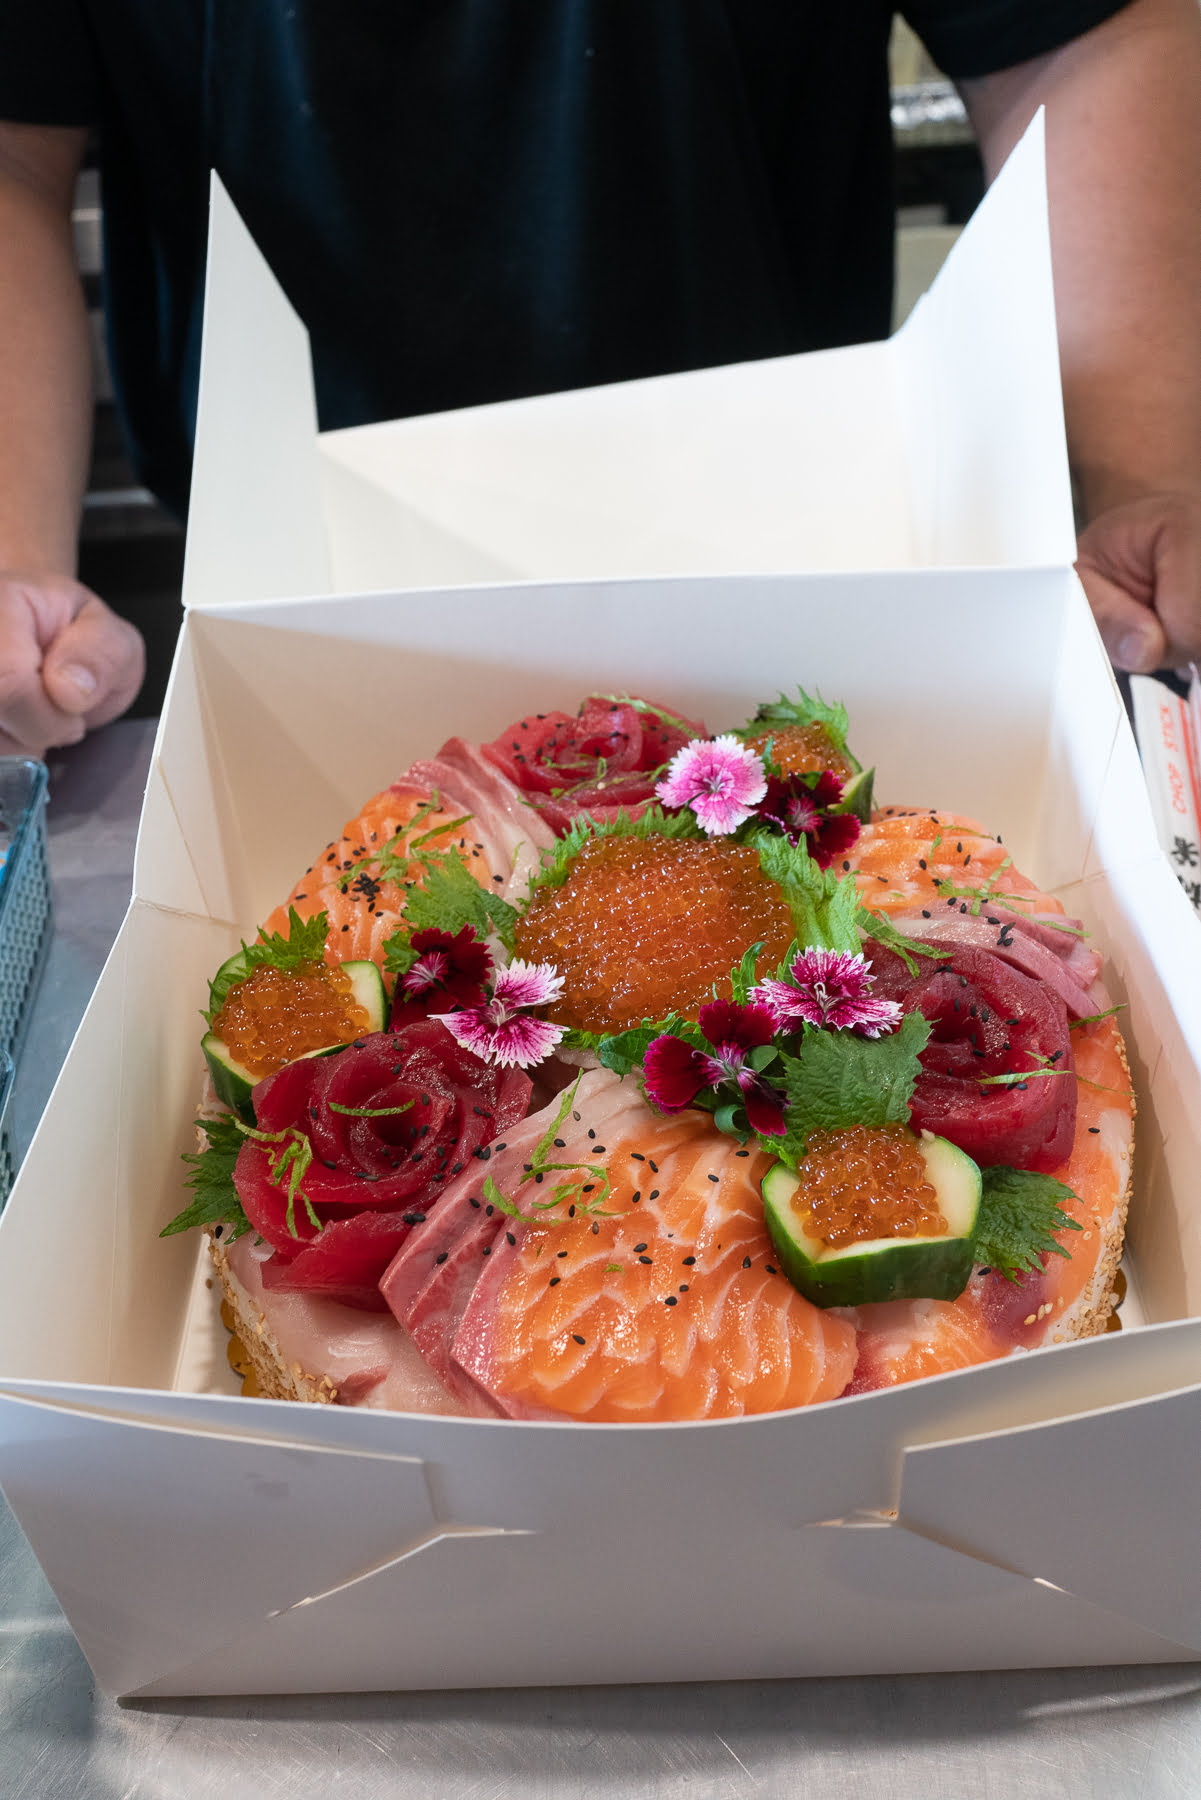
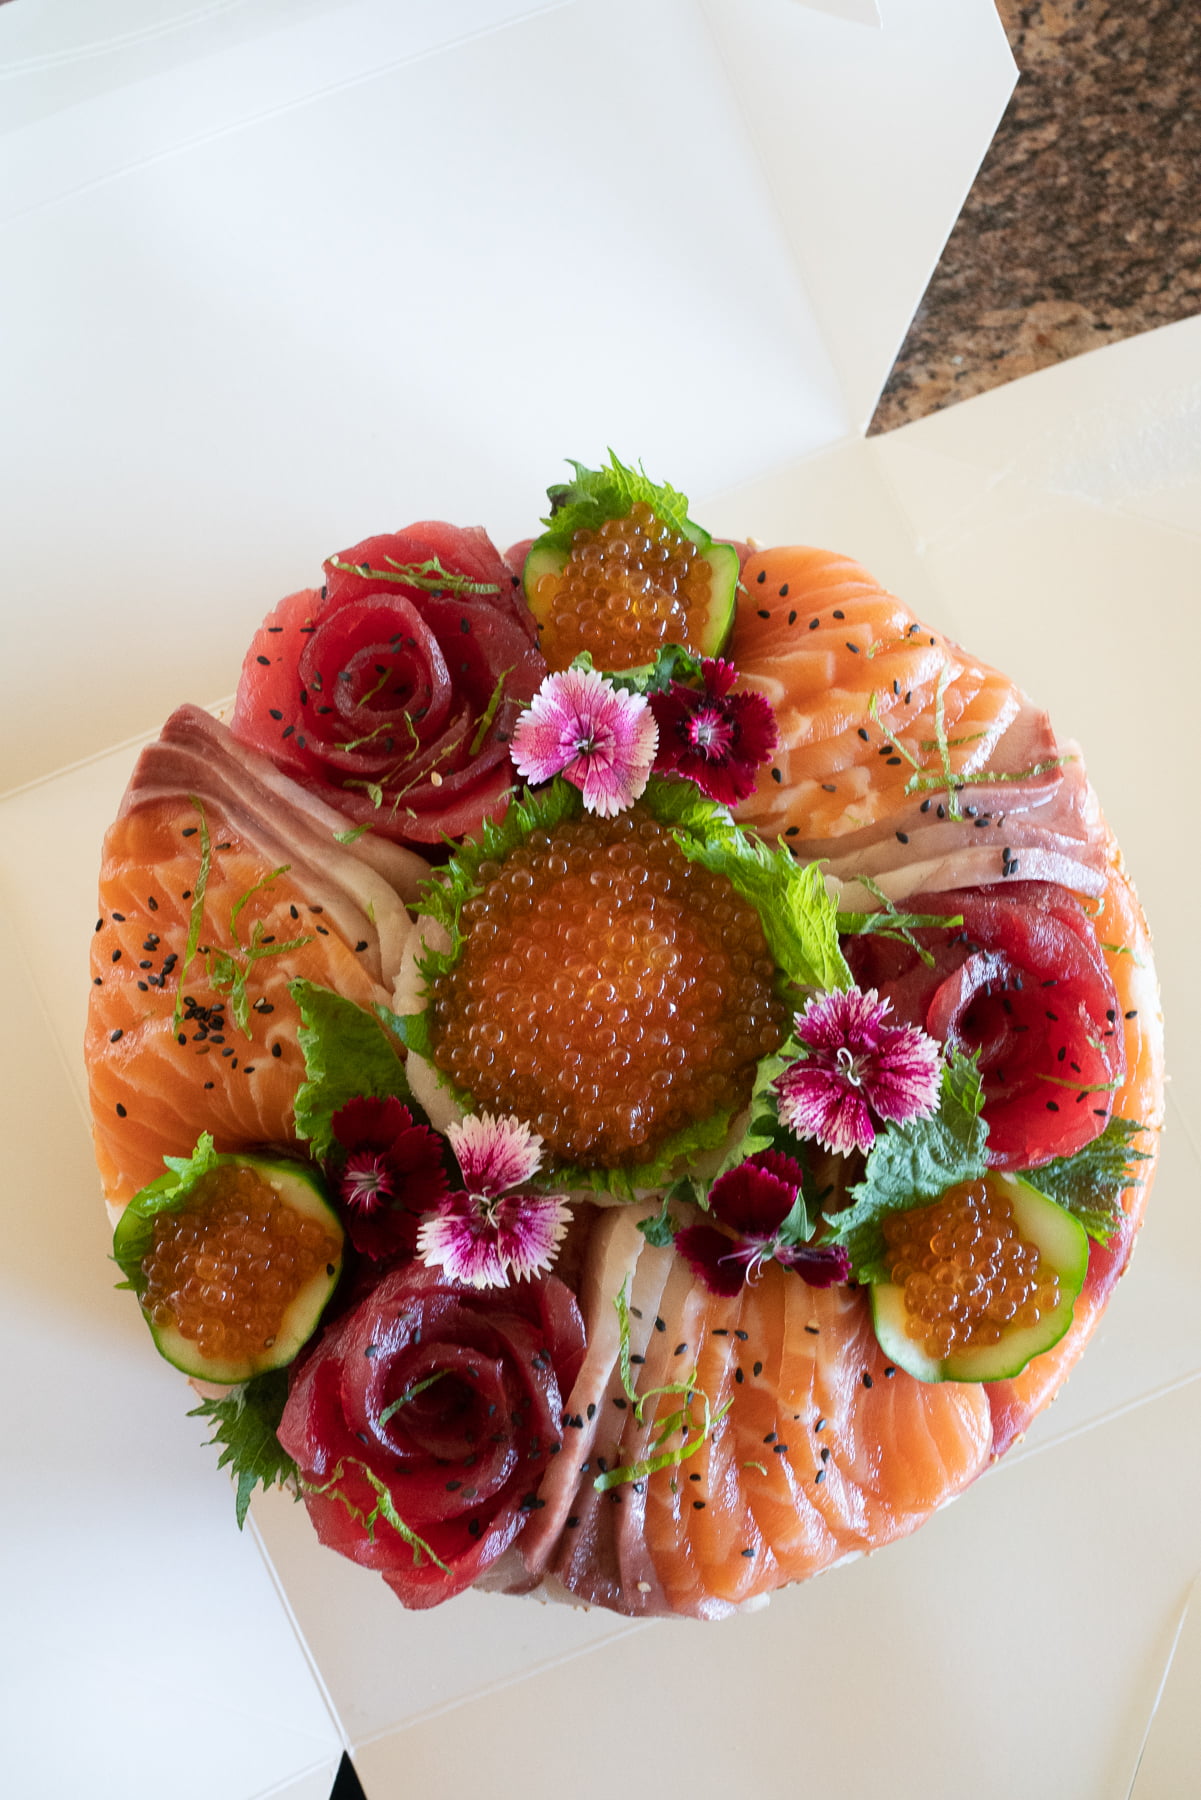
The top layer of sushi cakes are "frosted" with a colorful arrangement of fresh sashimi (including ahi tuna, hamachi, and salmon). Some sashimi pieces are arranged into a pretty rose configuration. Others are topped with black sesame seeds and thinly sliced shiso leaves.
And don't forget the ikura (cured salmon roe). I love the bright and shiny pops of color ikura adds. Plus, ikura is always just so ono ^_^
Other ingredients also include cucumber "cups" to hold the ikura, edible flowers, and whole and sliced shiso leaves to add color and serve as a "plate" for the sashimi.
Chirashi Layer
Between the top sushi rice layer and the "frosting" layer is what I call the chirashi layer. This layer includes all the different types of sashimi chopped up and gently pressed over the top layer of sushi rice.
Final Touches
You might also notice the sides of cakes are often finished with a sprinkle of white sesame seeds. It's all in the little touches ^_^
Sauces and Sides
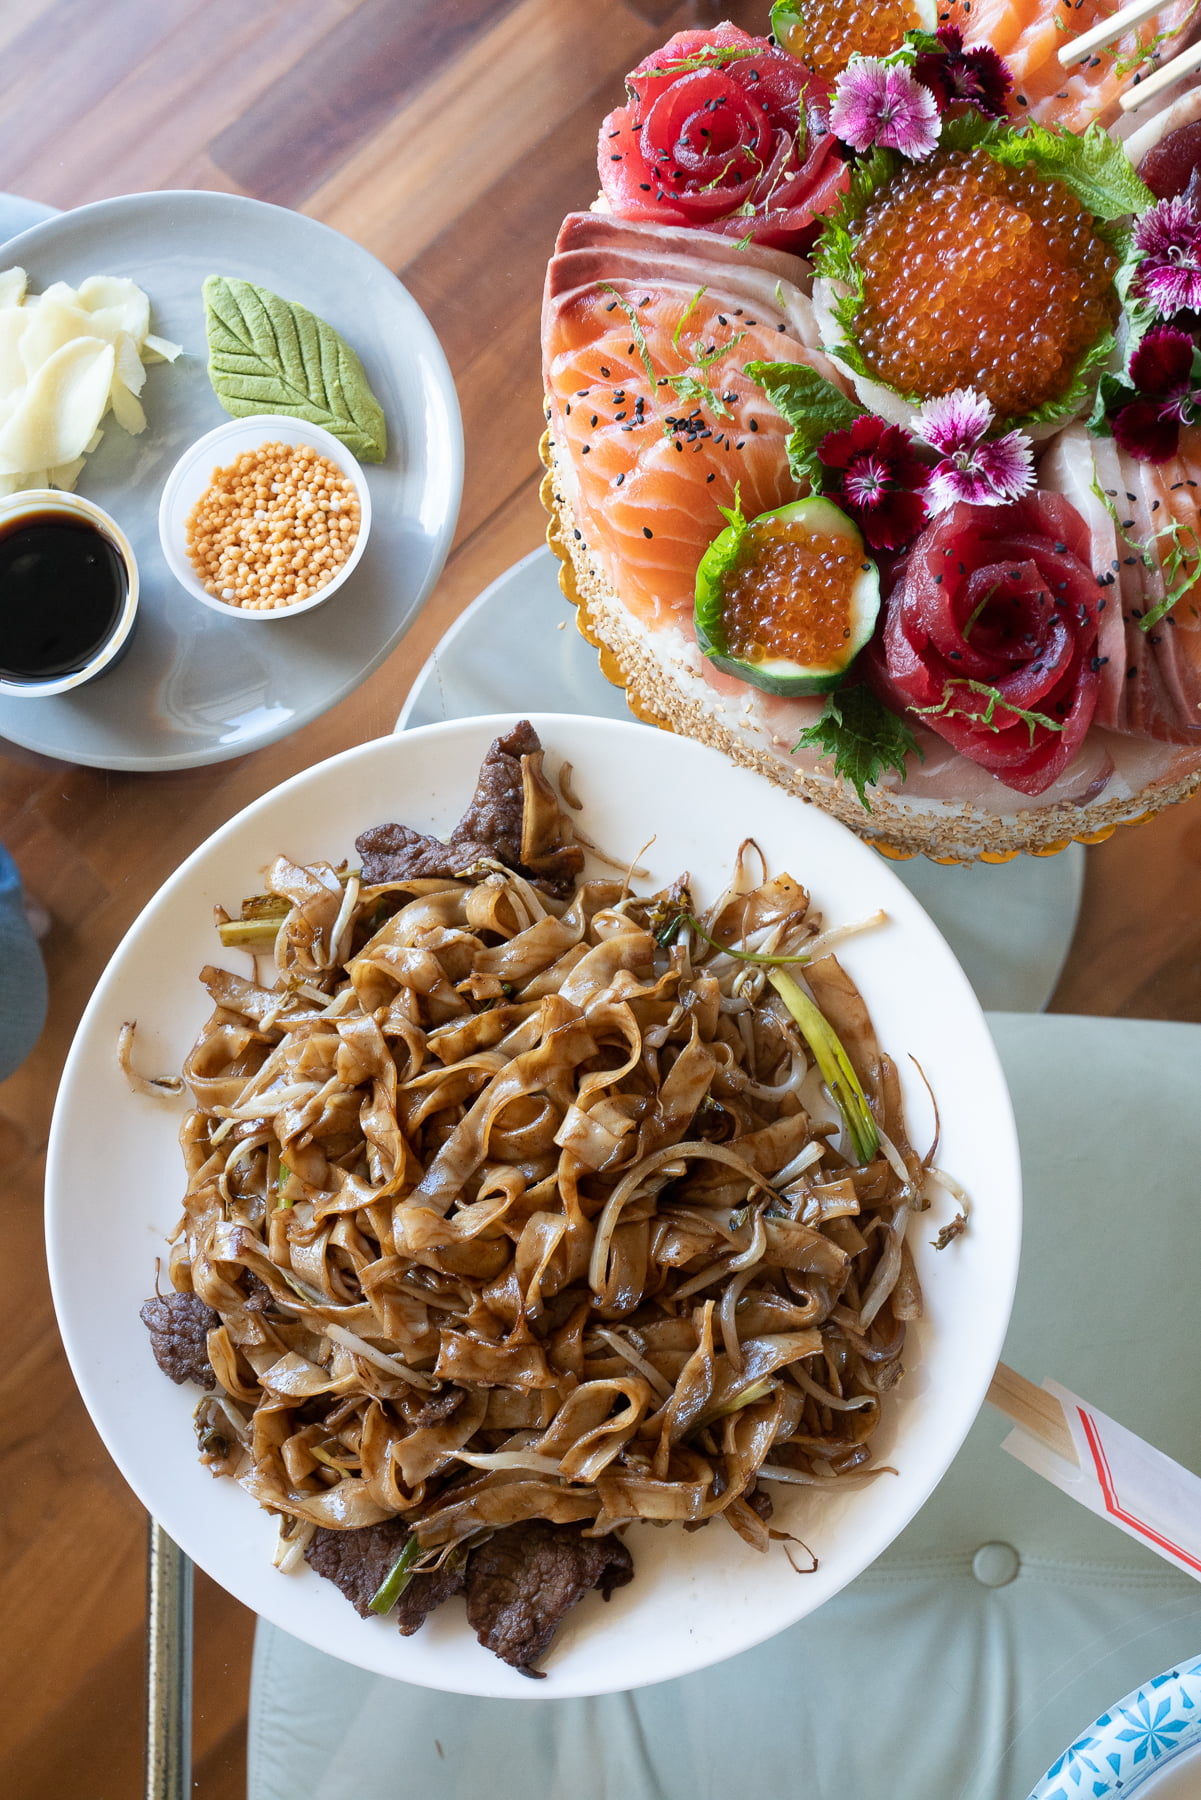
Sushi cakes often come with a small container of sauces and sides including bubu arare (for crunch!), wasabi and shoyu/soy sauce (to dip the sashimi pieces), unagi sauce (to drizzle on individual cake slides), and pickled ginger slices.
Lucky Bonus / Mini Cake
I don't know if all sushi cake places do this, but if you look at the center of the frosting layer you can see a generous portion of ikura nestled into a "cup" of shiso leaves and hamachi slices. Underneath that is actually a small layer of sushi rice. It is a whole miniature sushi cake! You can lift that up as one piece and plate it nicely. Give that to the lucky birthday person ^_^
Why Are Sushi Cakes Popular in Hawaii?
Good question. Two main reasons:
- We love sushi in Hawaii. Like REALLY love sushi from fancy sushi to casual sushi. Why do we love sushi? Because we are lucky to get wonderful and fresh fish in Hawaii! Also we love rice.
- Lots of family gatherings and potlucks. Hawaii is very family/community oriented. As a result, big and frequent family dinners and gathering are common. A sushi cake only works if you have a people to share it with (the cake must be enjoyed the day it's made, it will not keep overnight).
Make sure to try sushi cake next time you are in Hawaii!
How To Eat Sushi Cake
Here are the steps:
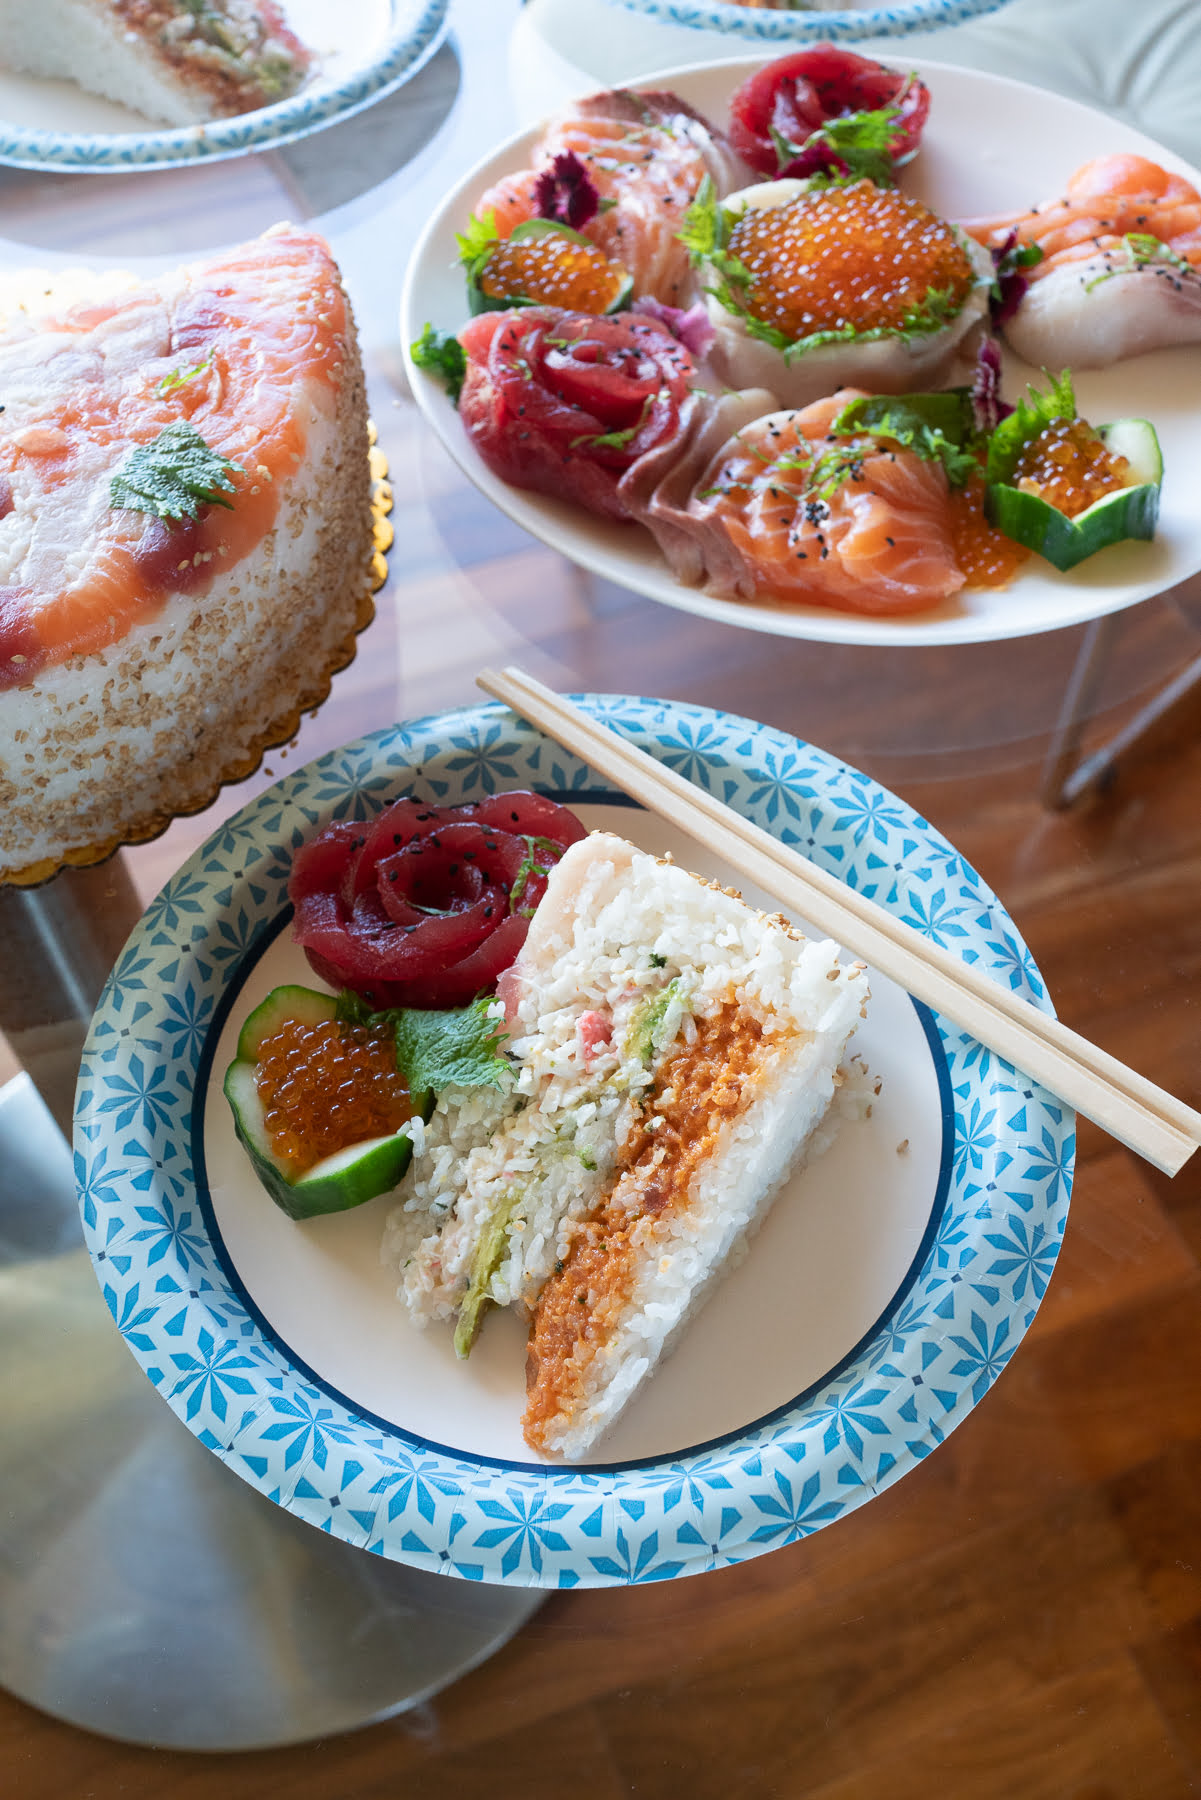
- Get an extra plate. Remove all the components of the top "frosting layer" onto that extra plate. I try to remove the components carefully and rearrange them in the same style on the plate.
- Using a sharp knife, cut the sushi cake into generous slices. We cut this specific cake into 10 pieces. Plate a slice for everyone. I put the slices sideways so that people can really see all the different layers inside the cake.
- Give everyone some of the sashimi from the "frosting layer." In the photo above, you can see that slice got one of the ahi roses and some ikura. Best to make sure that all slices get a bit of all the variety of sashimi.
- Put all the sides/sauces (bubu arare, wasabi and shoyu/soy sauce, unagi sauce, and pickled ginger) in the middle of the table and let everyone serve themselves. You can sprinkle bubu arare on top for crunch. Drizzle the unagi sauce over the cake slice. Dab a little wasabi on the side of your plate, and drip the sashimi into the shoyu/soy sauce.
It's straightforward, you just want to make sure to remove the frosting layer before cutting the cake.
Sushi Cake In Hawaii
Here are a few great places to order sushi cake in Hawaii:
- Aloha Cones (that's where we got the cake pictured in this post) - sushi cake examples here and here.
- Kahiau Poke & Provisions - see example of their sushi cakes here and here.
- 808 Poke Cakes
- Bakudan Poke
- Aloha Souza Fish House
Make sure to order at least a week in advance. Many of these places book up especially during graduation season and all the holidays. We ordered this cake two weeks in advance. I've heard of people having to order one month in advance during busy times.
FAQ
Prices vary depending on who you order from, the size of the cake, and any specific ingredients you might want included in the cake. I've seen prices in the range of $100-200 so it can vary. The cake pictured in this post was $140 from Aloha Cones.
You have to eat it the day it's made. Sushi cakes will not keep overnight (the rice will get hard in the fridge and you don't want to eat day old sashimi).
Ideally you would pick it up from the shop and eat it within the next hour or two. Or you can put it in the fridge for no more than a few hours (eg. if you pick it up during the day but want to serve it for dinner), and then remove the cake from the refrigerator 15 minutes before serving.
I've heard people call this "sashimi cake" before, but "sushi cake" is the correct name.
Yes! But we also like to eat a hot dish along with the sushi cake. So in this case we got beef chow funn from Lam's Kitchen to accompany our sushi cake. It was a super onolicious pairing ^_^
If You Love Sushi Cake...
Check out my other popular posts related to sushi and all things good:
- Sushi in Hawaii.
- Casual Sushi in Hawaii.
- Make Ikura (Cured Salmon Roe) at home.
- Maguro Brothers.
- Pan Sushi.
- Sushi Bake.
Enjoy, enjoy!
Make Sushi Cake At Home!
Ready to try make your own sushi cake? It requires planning but it is not that hard to make! It's also really fun. I get so much joy out of making sushi (I only do it once or twice a year for birthdays) and always look forward to it! Let's begin ^_^
Sushi Cake Ingredients
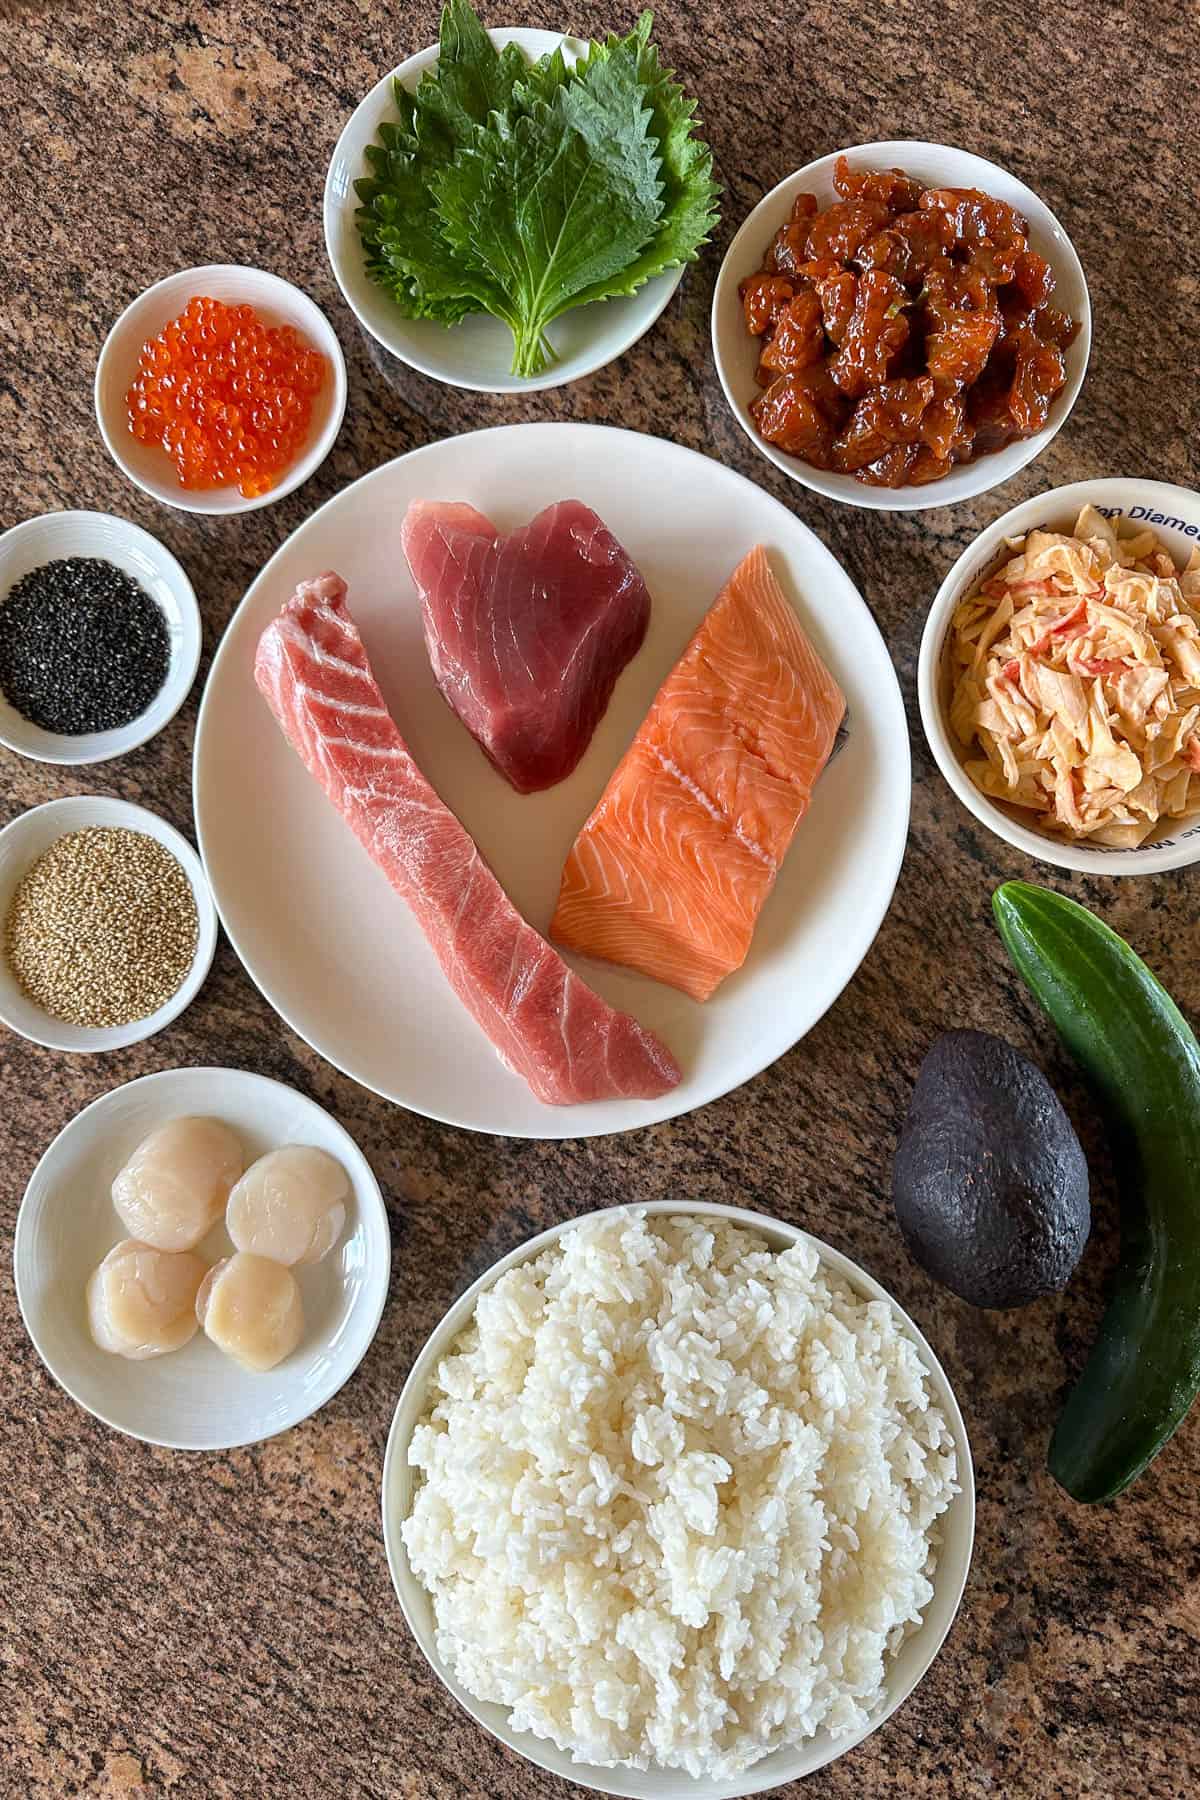
Here's what you'll need:
- Rice
- Sushi vinegar
- White sesame seeds (and black sesame seeds if you have)
- Shiso leaves
- Avocado
- Cucumber
- Imitation crab salad - If you're market doesn't sell imitation crab salad, you can do a quick makeshift version at home. Just shred the imitation crab and place in a bowl. Add some mayo (Kewpie, if you can) and mix. Then add chopped green onions, a little soy sauce, sesame oil, and Sriracha (optional). Mix well and it's ready!
- Ahi poke - You can use any type of poke. I used spicy ahi poke in this post. Markets in Hawaii often carry several types of poke, so pick the one you that looks tastiest to you! I recommend sticking with an ahi-based poke to keep things "classic."
- Ikura
- Scallop sashimi
- Salmon sashimi
- Ahi sashimi
- Chutoro sashimi
Note on the sashimi: I used four types of sashimi for this cake. You don't have to use the same four types that I used, but you'll want scallops for sure - it helps form the center "crown" and is a good color contrast with the ikura.
For the other three fish, pick any type. I used salmon, ahi, and chutoro. Why? Because I love eating all three and the color contrast looks great on sushi cake!
Keep color contrast in mind when picking your three fish. But above all, select what looks best and most fresh at the market. That is most important.
Sushi Cake Method
This is less of a cooking recipe and more of a "how to assemble a sushi cake" type recipe. But before all that, we need to prepare the rice!
Having good sushi rice is KEY to a great sushi cake.
You know how bread is the most important part of a great sandwich? Rice is the most important part of a great sushi cake.
Prepare the rice.
Once the rice is done cooking in the rice cooker, open the rice cooker and gently fluff the rice. Let cool for 5 minutes.
During those 5 minutes, mix the sushi vinegar, sugar, and salt together until dissolved. Then pour the mixture over the warm rice and gently mix with a rice paddle. Set aside and let cool while you prepare the rest of the ingredients.
Prepare the fish and seafood.
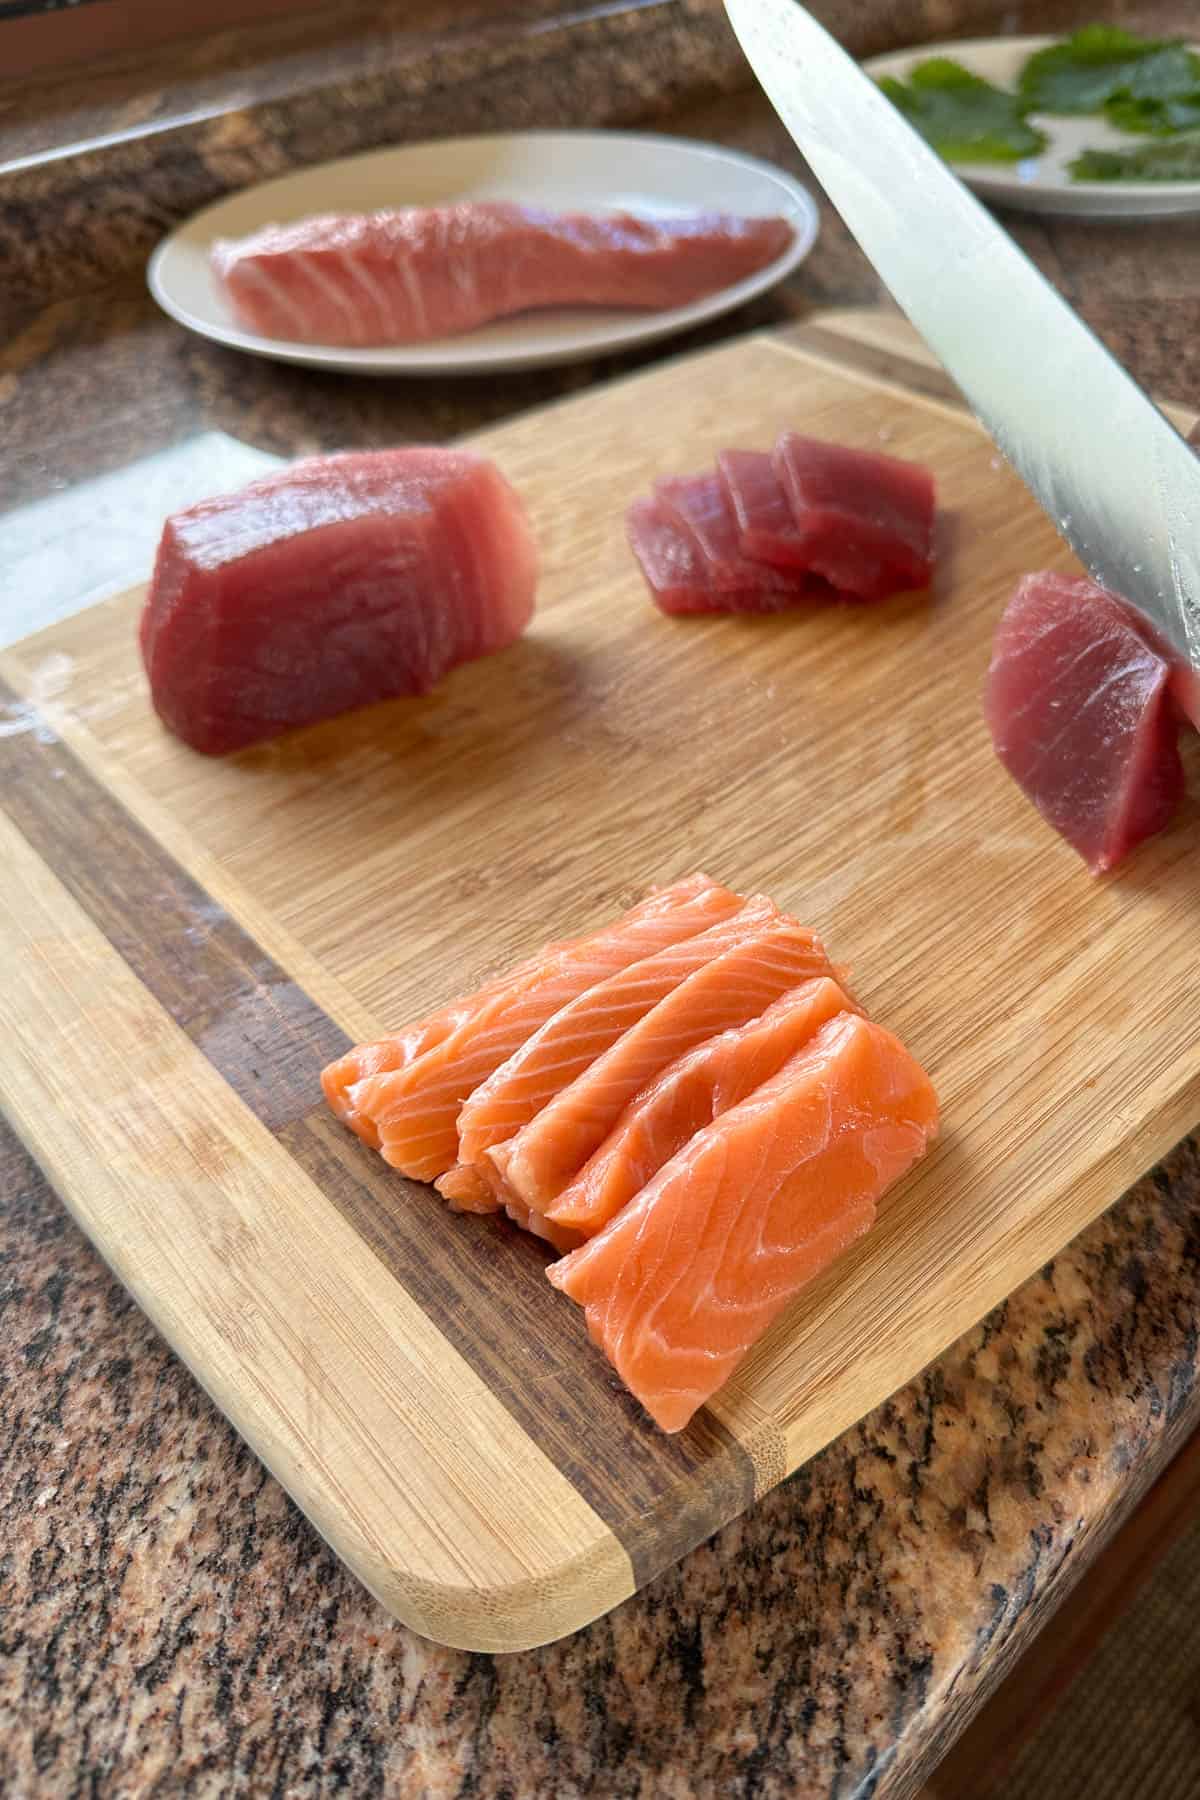
If you bought the sashimi already sliced, great! No need to do this step. But if you need to slice the sashimi, now is the time to do so.
Slice the scallops and set aside. Then slice the ahi, salmon, and chutoro. Place everything on a plate. Cover with plastic wrap and store in the refrigerator.
Prepare the ahi poke and imitation crab salad.
I used store bought ahi poke and imitation crab salad. They usually come in large pieces/chunks but because we are going to spread this over the rice layers, we want it in smaller pieces. Use a knife and finely chop the poke and salad, then set aside.
Prepare the shiso, cucumber, and avocado.
Wash and pat dry the shiso leaves. Thinly slice the cucumber - I use a madoline.
I used to also slice the avocado at this step, but now I like to do that last minute (right before we place the avocado on the sushi cake) to keep the avocado extra fresh and green.
Time to assemble the sushi cake! Prepare the pan.
Wash and dry any 8-inch pan. Use large piece of plastic wrap to cover the interior of the pan. Make sure to use a large enough piece of plastic wrap so that it hangs over the sides of the pan - this will make it easier to remove later.

Add rice layer 1.
Then use a rice paddle to scoop about a third of the rice. Gently pat it into the pan. You don't want to smash the rice into the pan, but you also want the rice to be pressed down firmly enough so that it doesn't fall apart later.
This first layer will become the "top" of the sushi cake when we flip it over layer so you want to make it nice and even.

Add the ahi poke layer.
Use a spoon to add all the ahi poke in a single and even layer. I don't spread all the way to the very edge because I like to leave the edges "clean." It looks nicer from a side view when serving the finished sushi cake.
Add rice layer 2.
Add a second layer of rice.
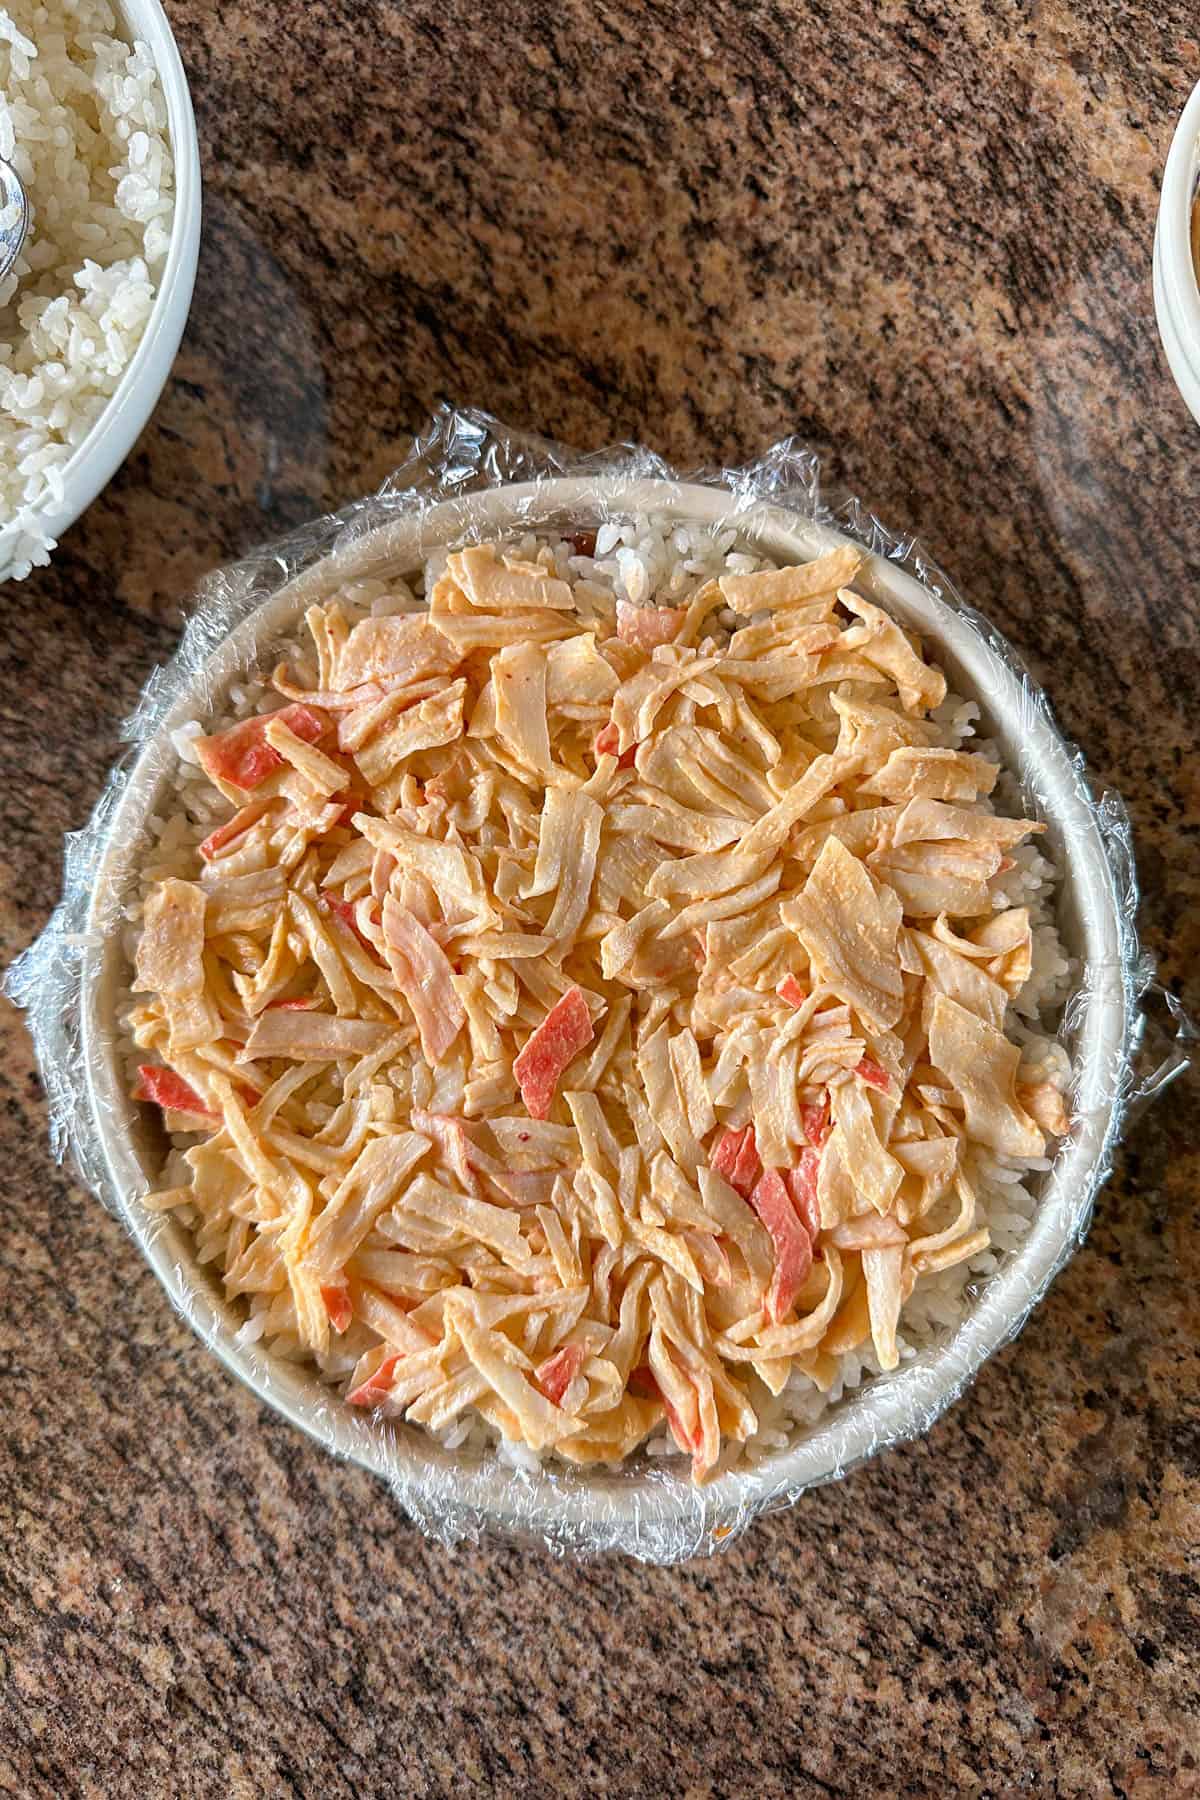
Add the imitation crab salad layer.
Use a spoon to add all the imitation crab salad in a single and even layer.

Add rice layer 3.
Add a third layer of rice.
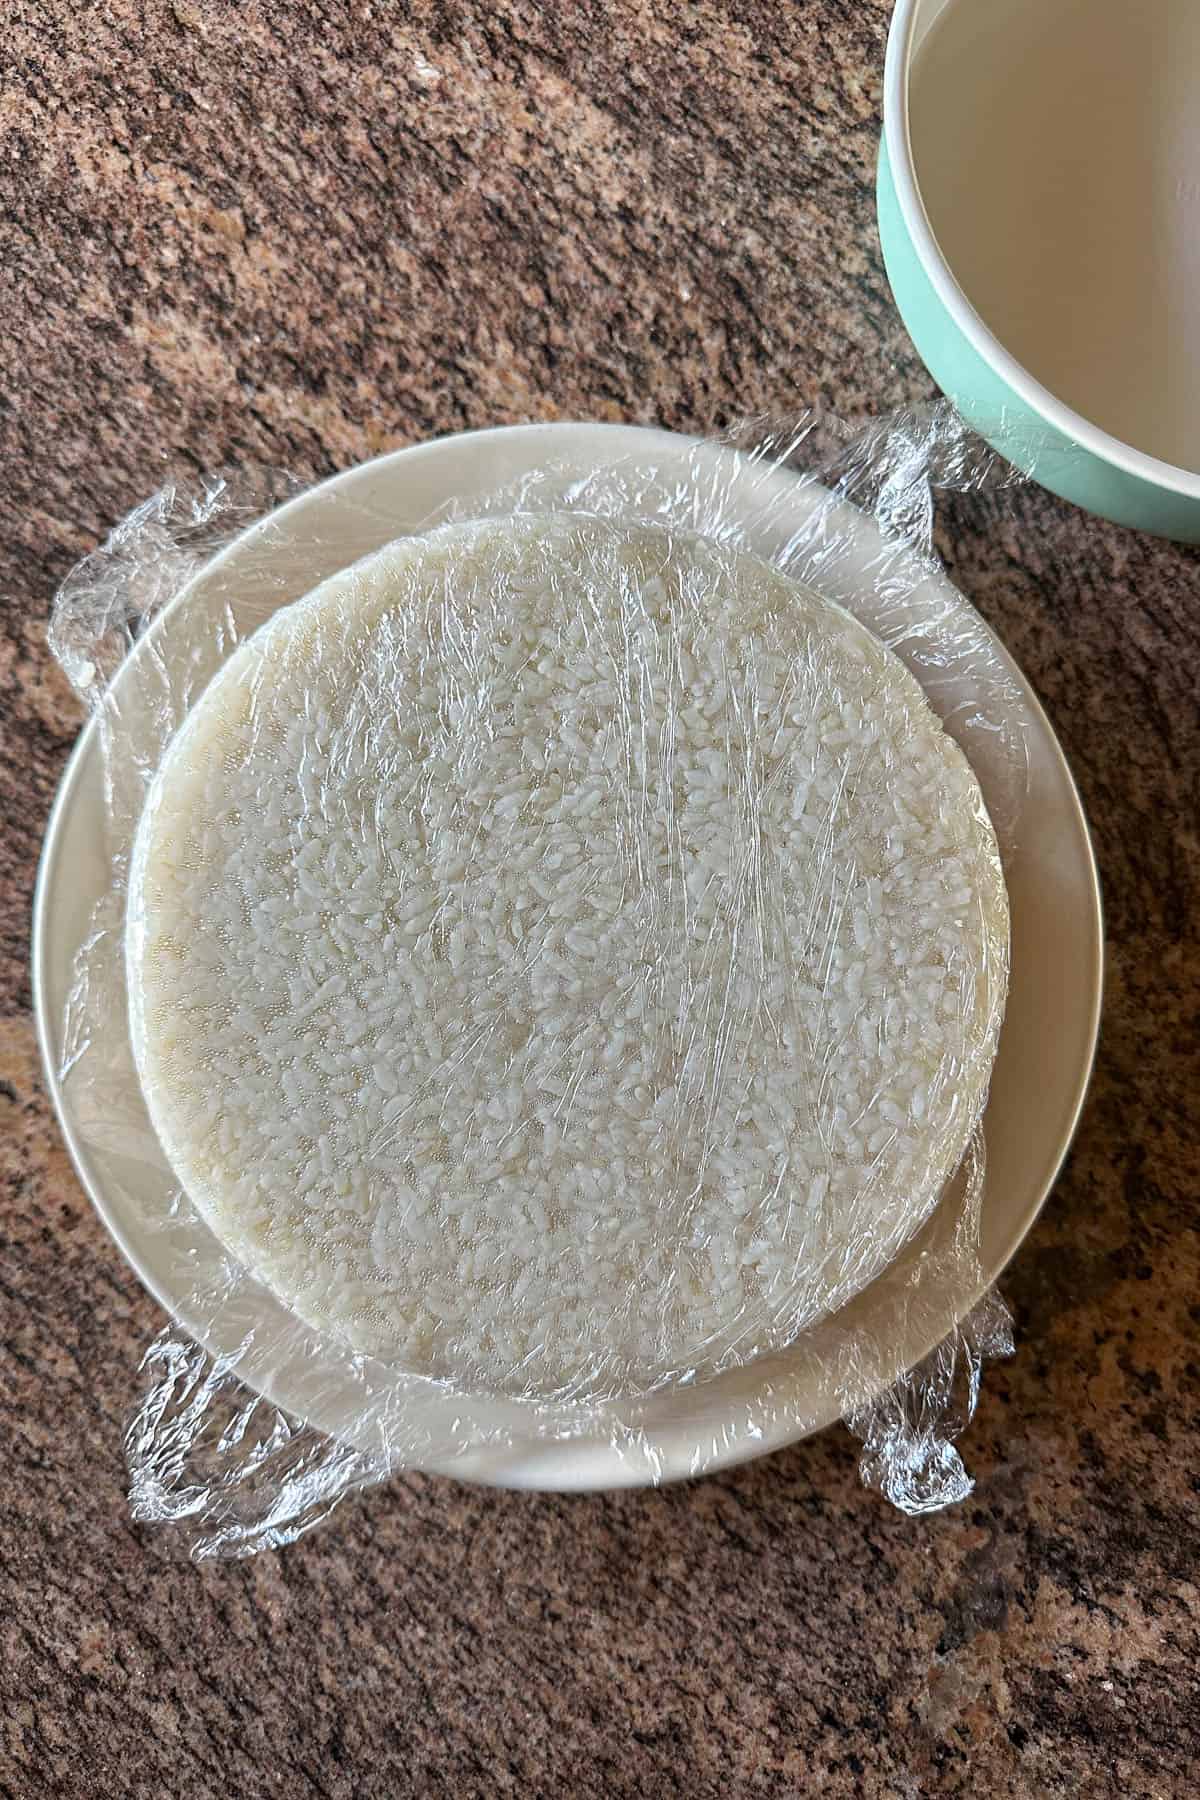
Press and flip.
You should have enough layers to reach the top of the pan (I actually went over a little but it's ok). Use the rice paddle to give everything a gentle firm pat (we don't want things to fall apart).
Then place a large serving plate on top of the pan. Slowly flip it over and remove the pan. Then remove the plastic wrap. Now you have completed the foundation of the cake.
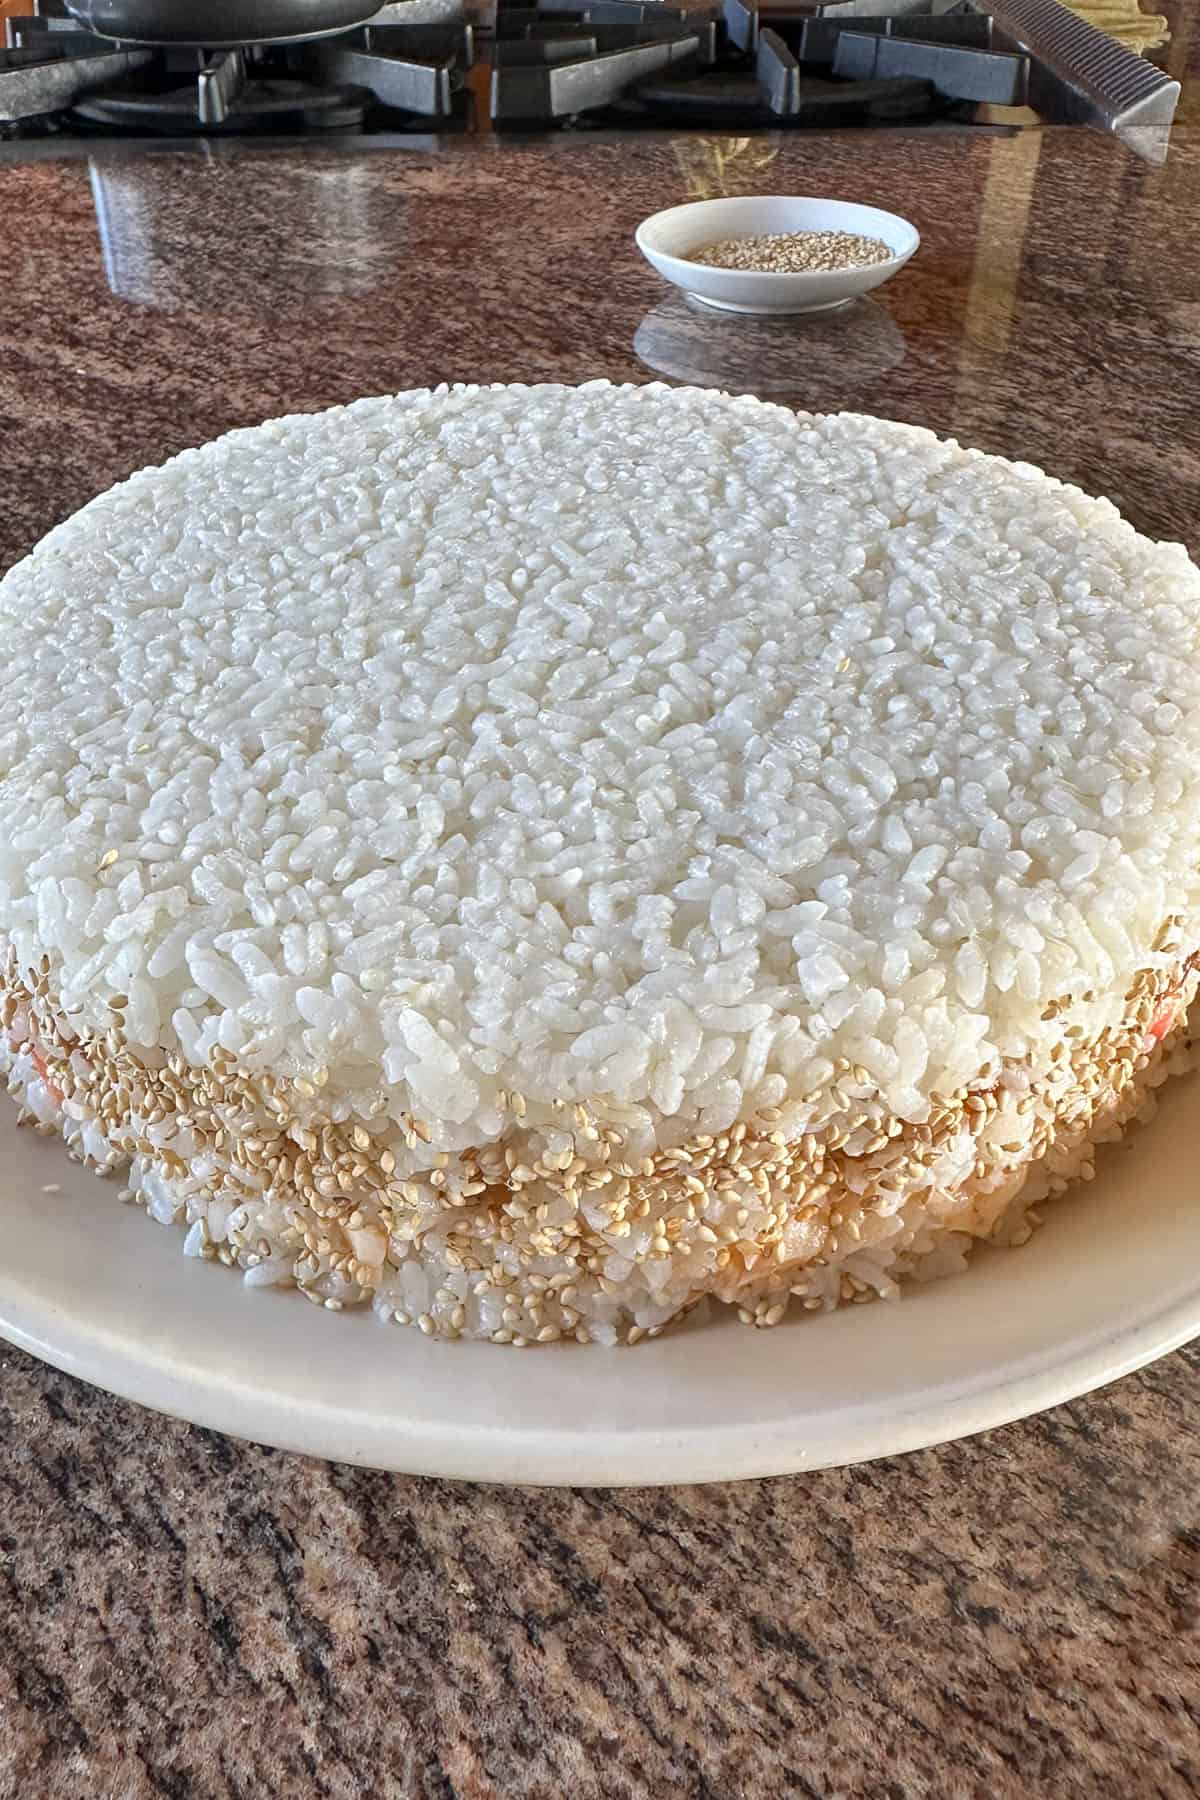
Add the sesame seeds.
Use your hands to lightly press the sesame seeds around the sides of the sushi cake. You can use as little or as much as you like. White sesame seeds are the default, but if you have black sesame seeds it's fun to mix both colors.
I had both white and black but forgot to add the black sesame seeds! That's what I get for trying to assemble, photograph, and take notes at the same time haha.

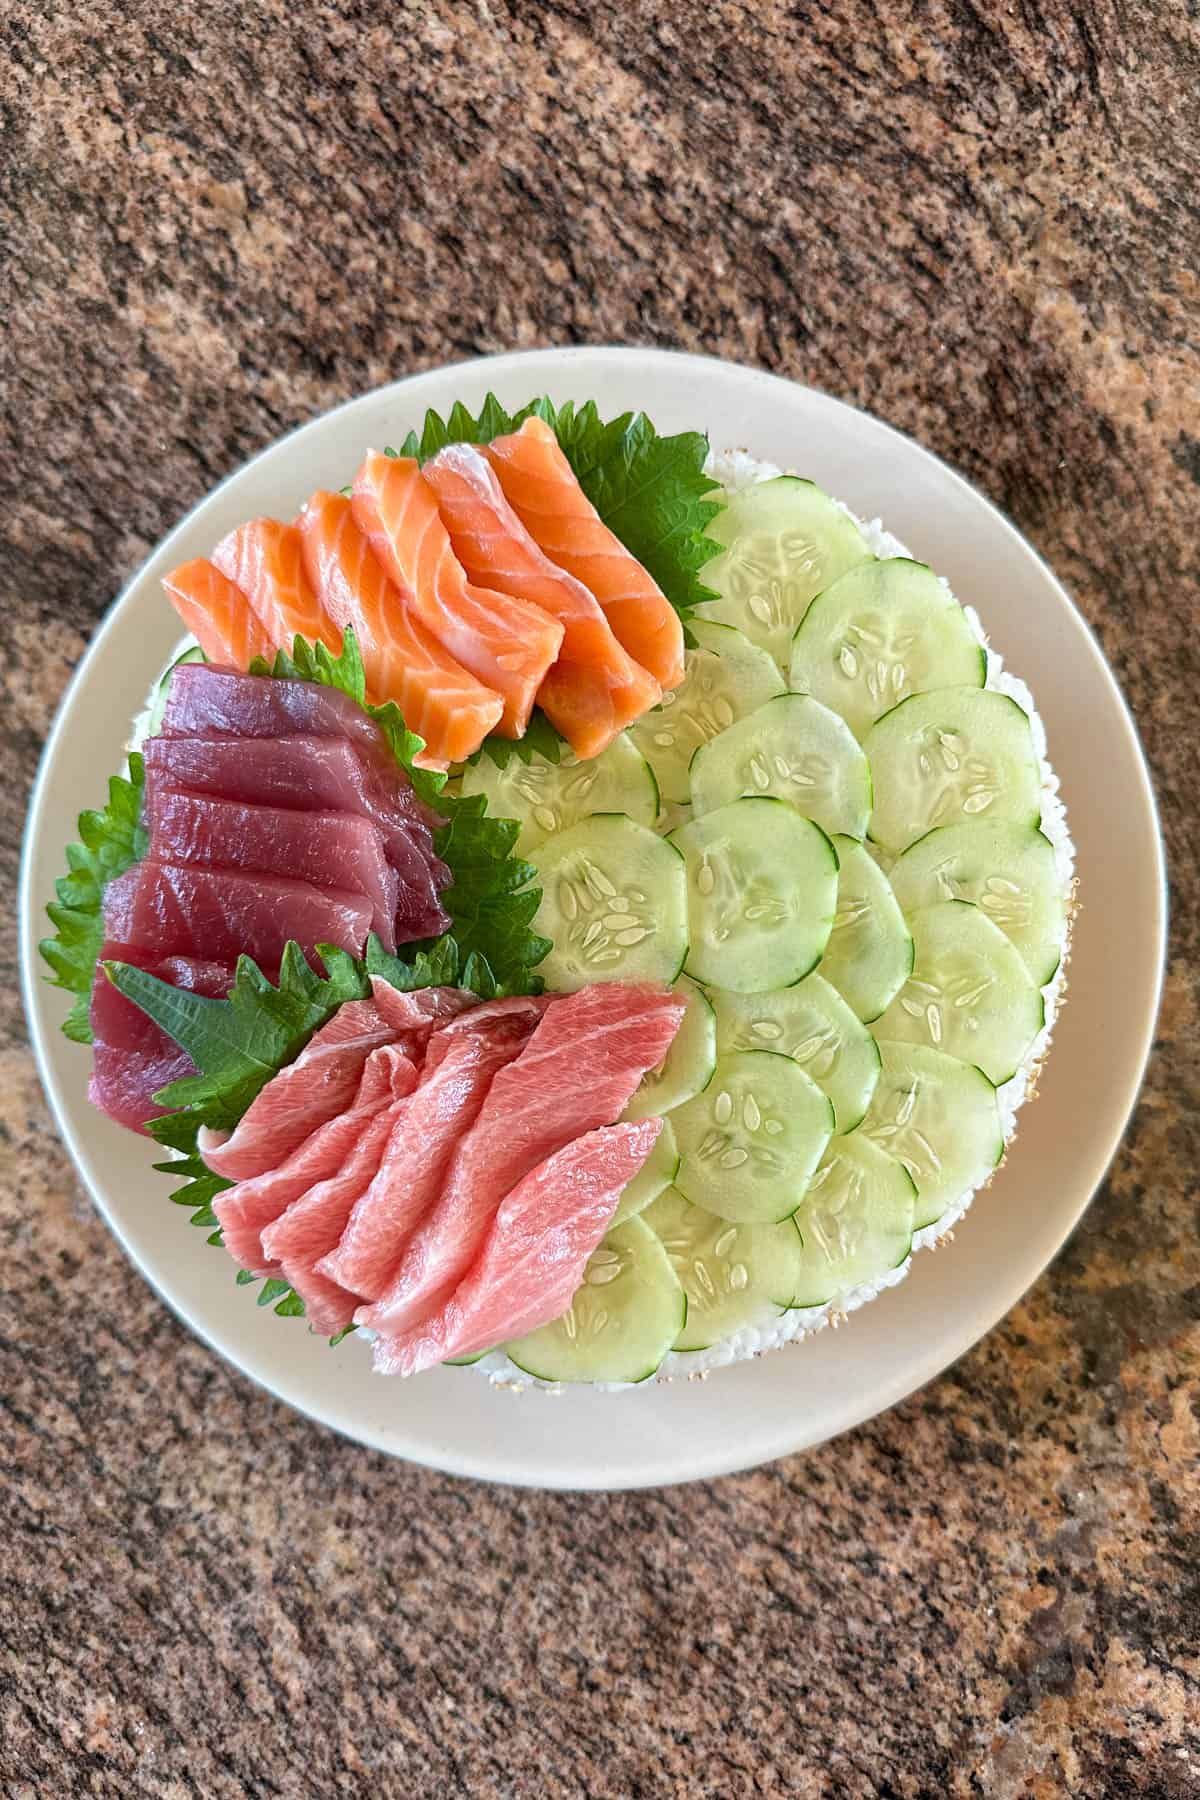
Add the cucumber layer.
Cover the surface of the sushi cake with the sliced cucumbers. Make it pretty.
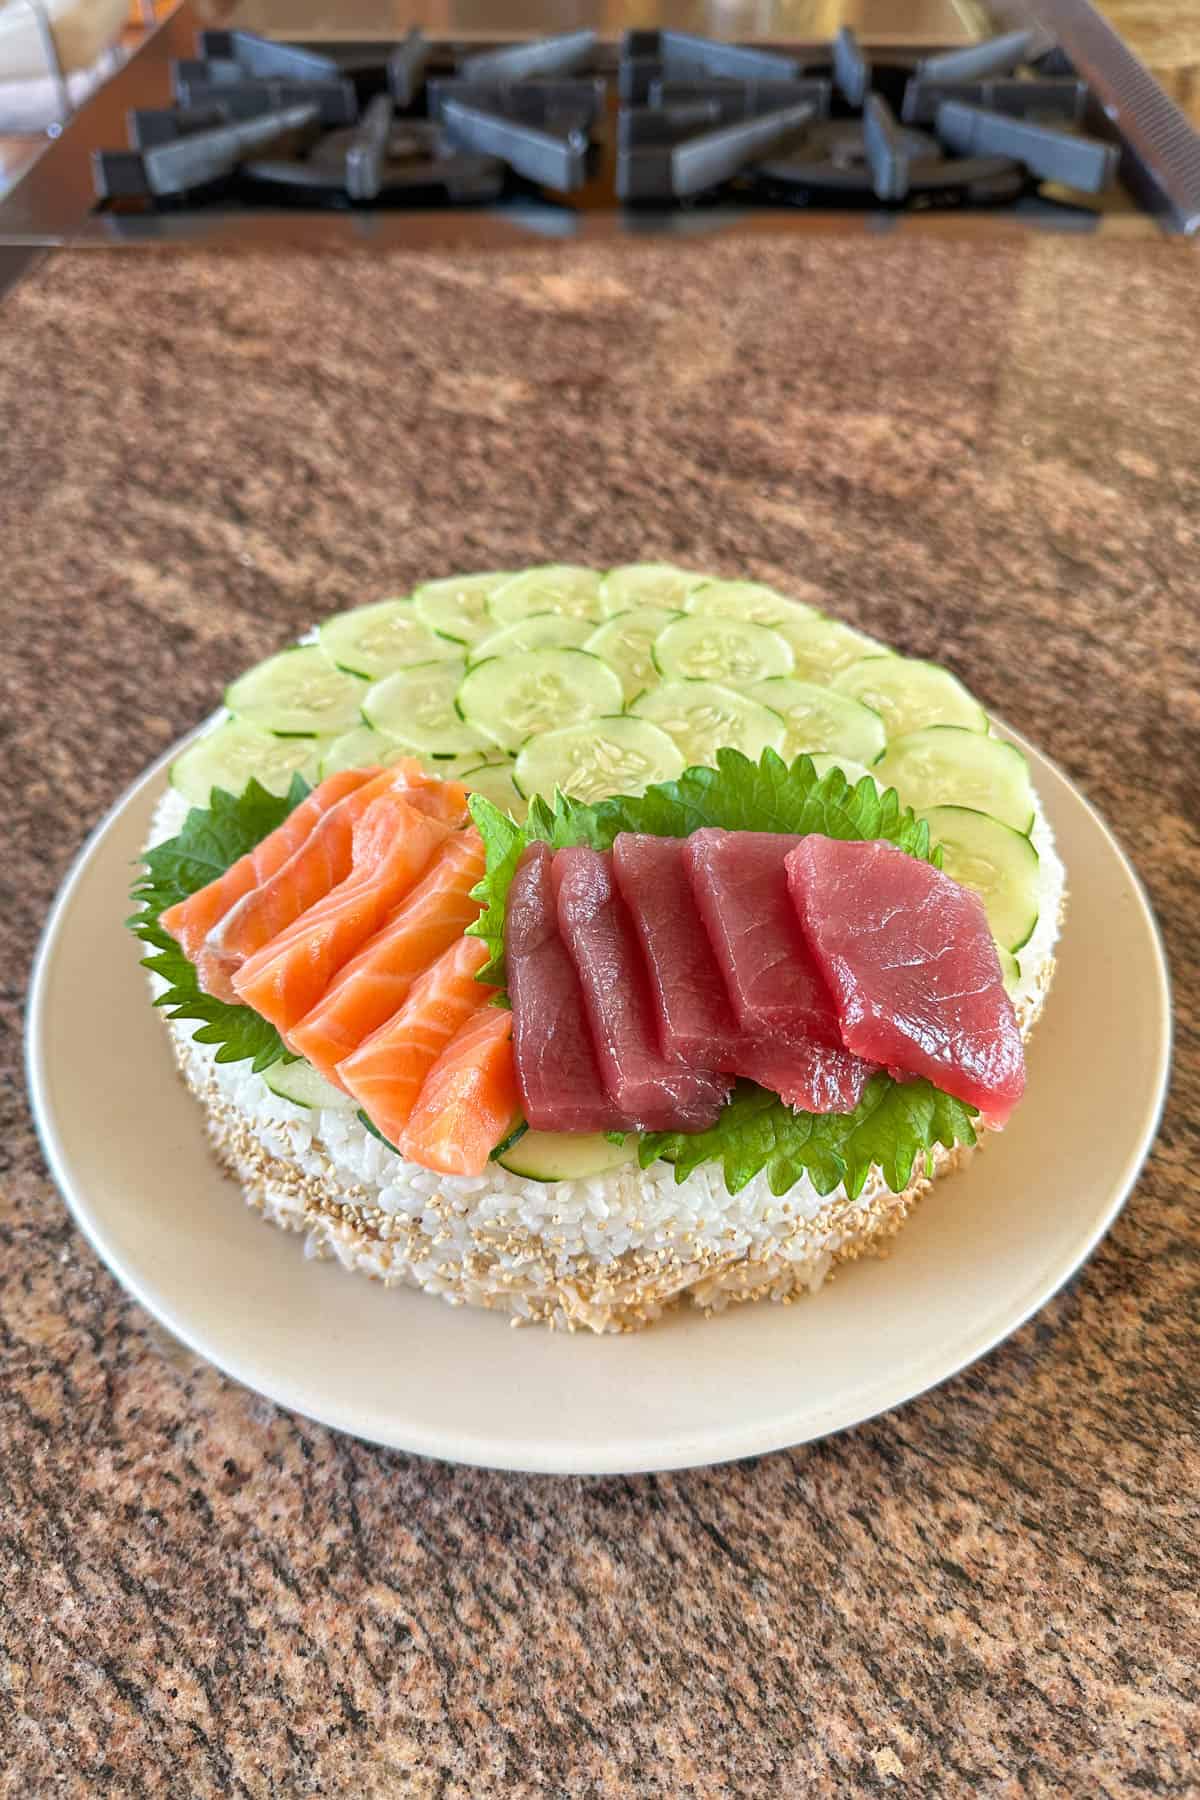
Add the sashimi!
Now this part is really up to your own "style." But I will tell you how I like to do it. First I take one shiso leaf and place it on top of the cucumber layer. Then add 3-5 slices of ahi sashimi on top of the shiso.
Next, I take a second shiso leaf and repeat with the salmon. Then repeat again with the chutoro.

Keep repeating the shiso plus three fish pattern until you form a full ring around the edge of the sushi cake. Leave the center part open so that you can place the avocado/scallop/ikura crown in the middle.
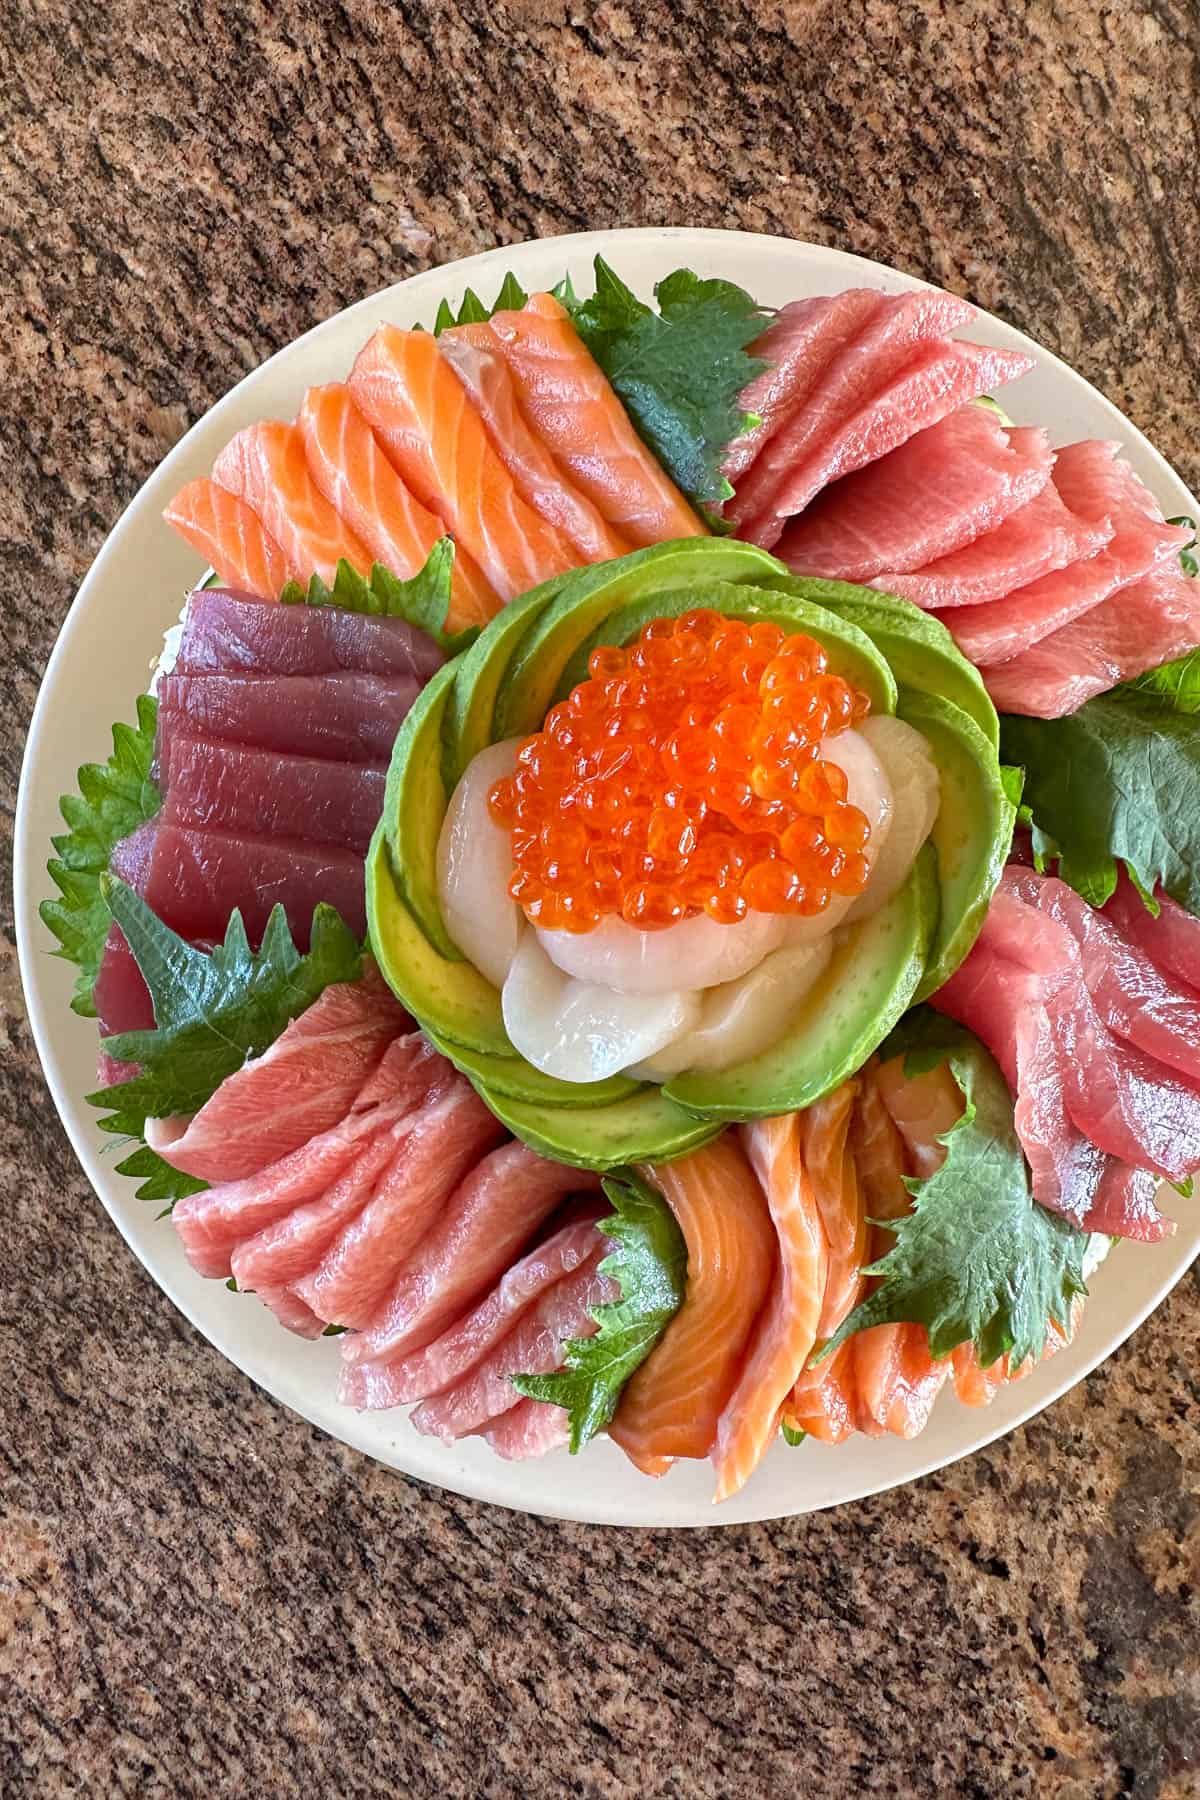
Make the center sashimi "crown."
Thinly slice the avocado and form a crown. Place it in the middle. Then layer in the sliced scallop sashimi.
Then top with the ikura. You want enough ikura so that the orange color really pops (the more ikura, the merrier!) But you don't want to cover the beautiful scallops, so arrange accordingly.
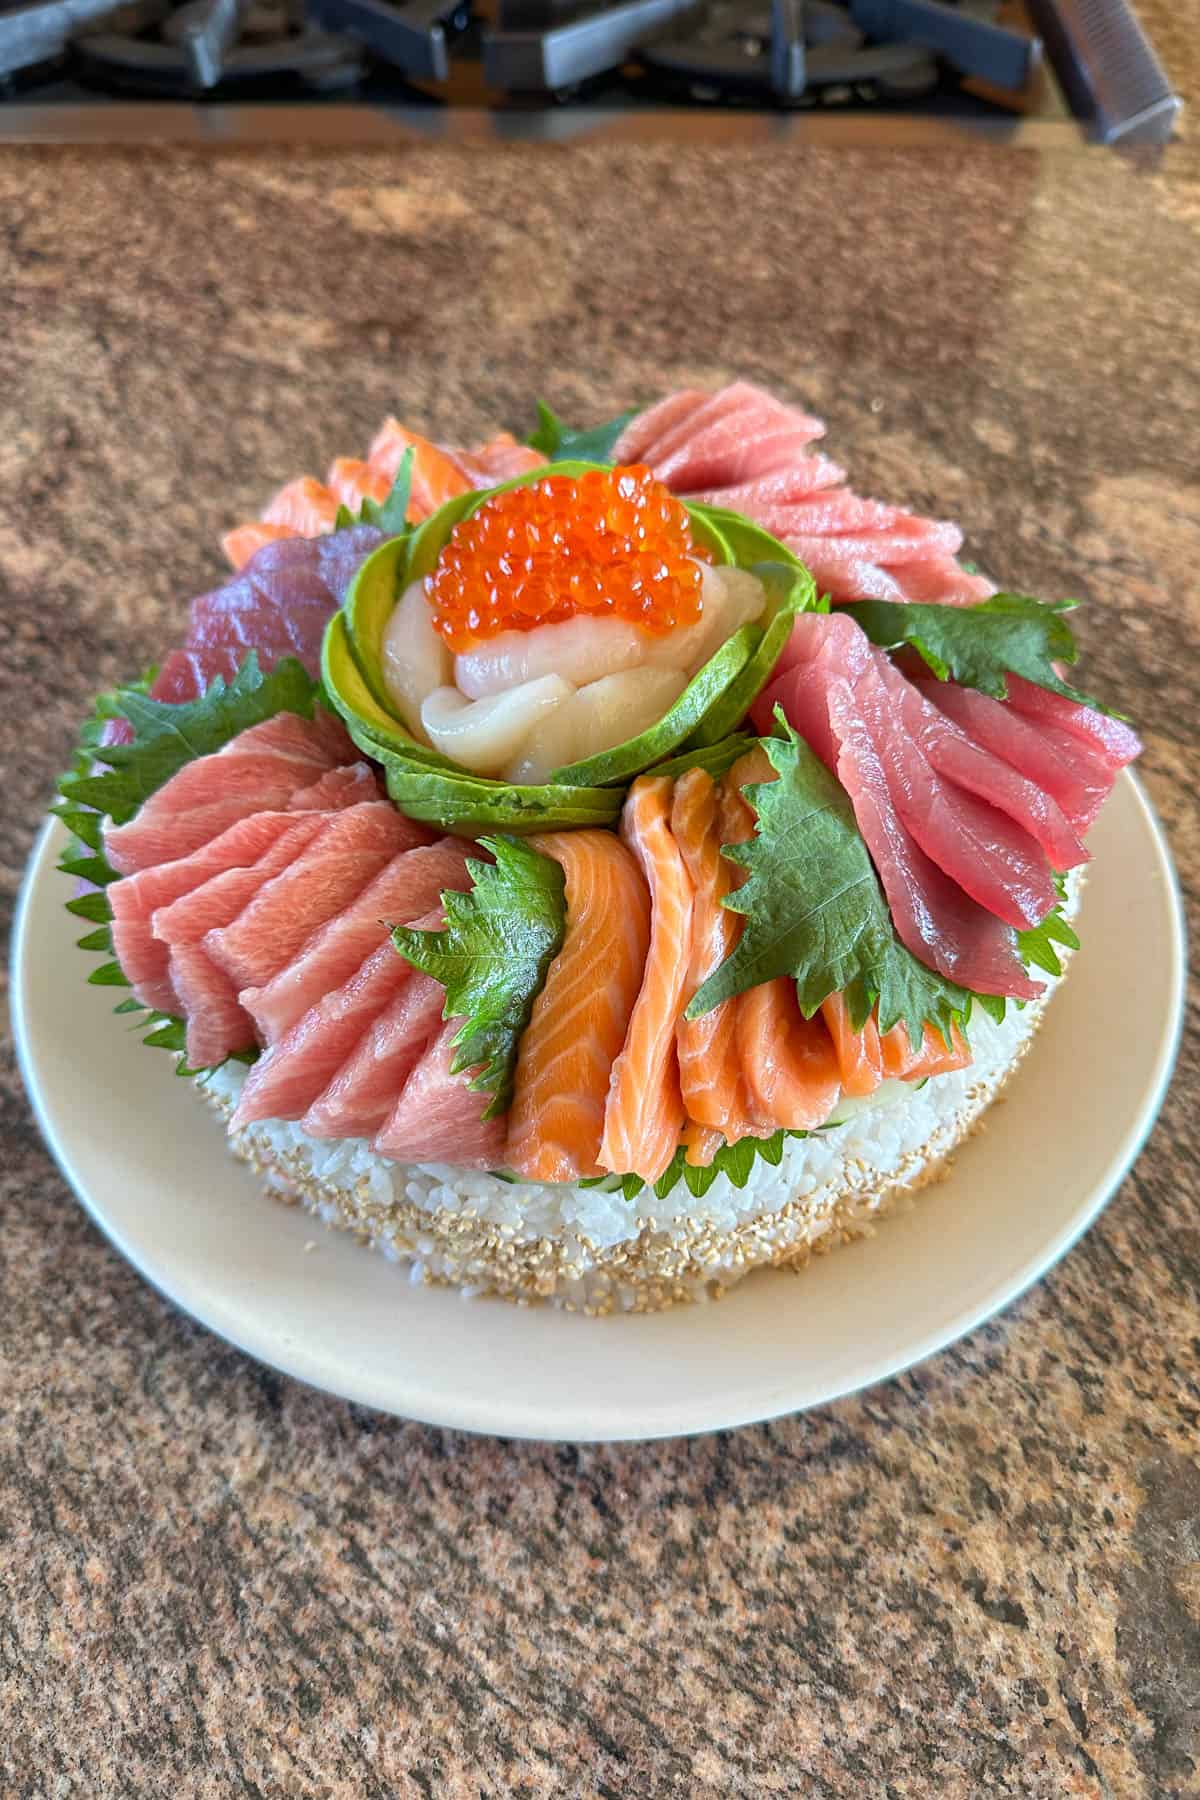
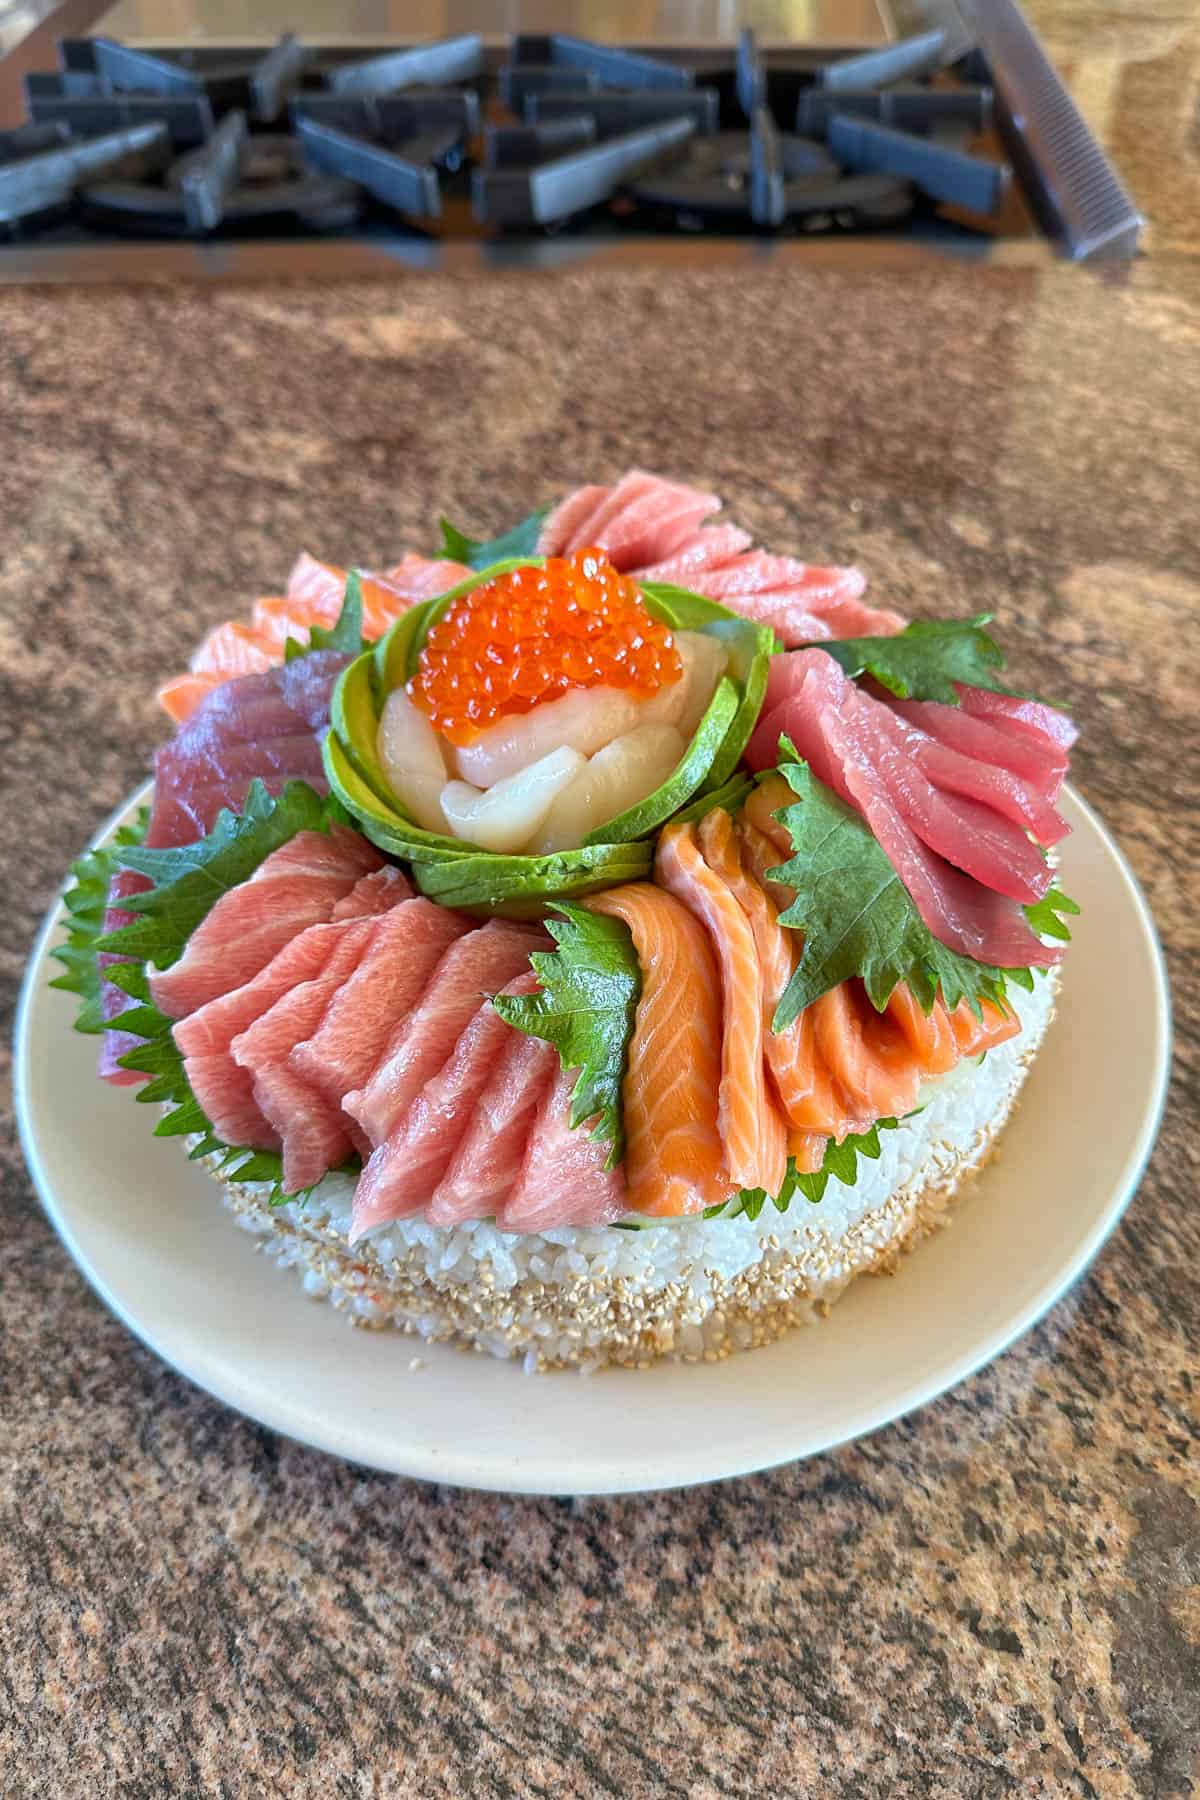
Now the sushi cake is finished!
How gorgeous is this beauty? It makes me happy to even just look at it!

Serve The Sushi Cake
I have a how to eat sushi cake section at the top of the post for store bought sushi cakes. Home sushi cake is a little more simple because we have fewer components. Here's how I like to serve:
First, carefully remove all the top (aka "frosting") layer of the sushi cake and place it on a plate.
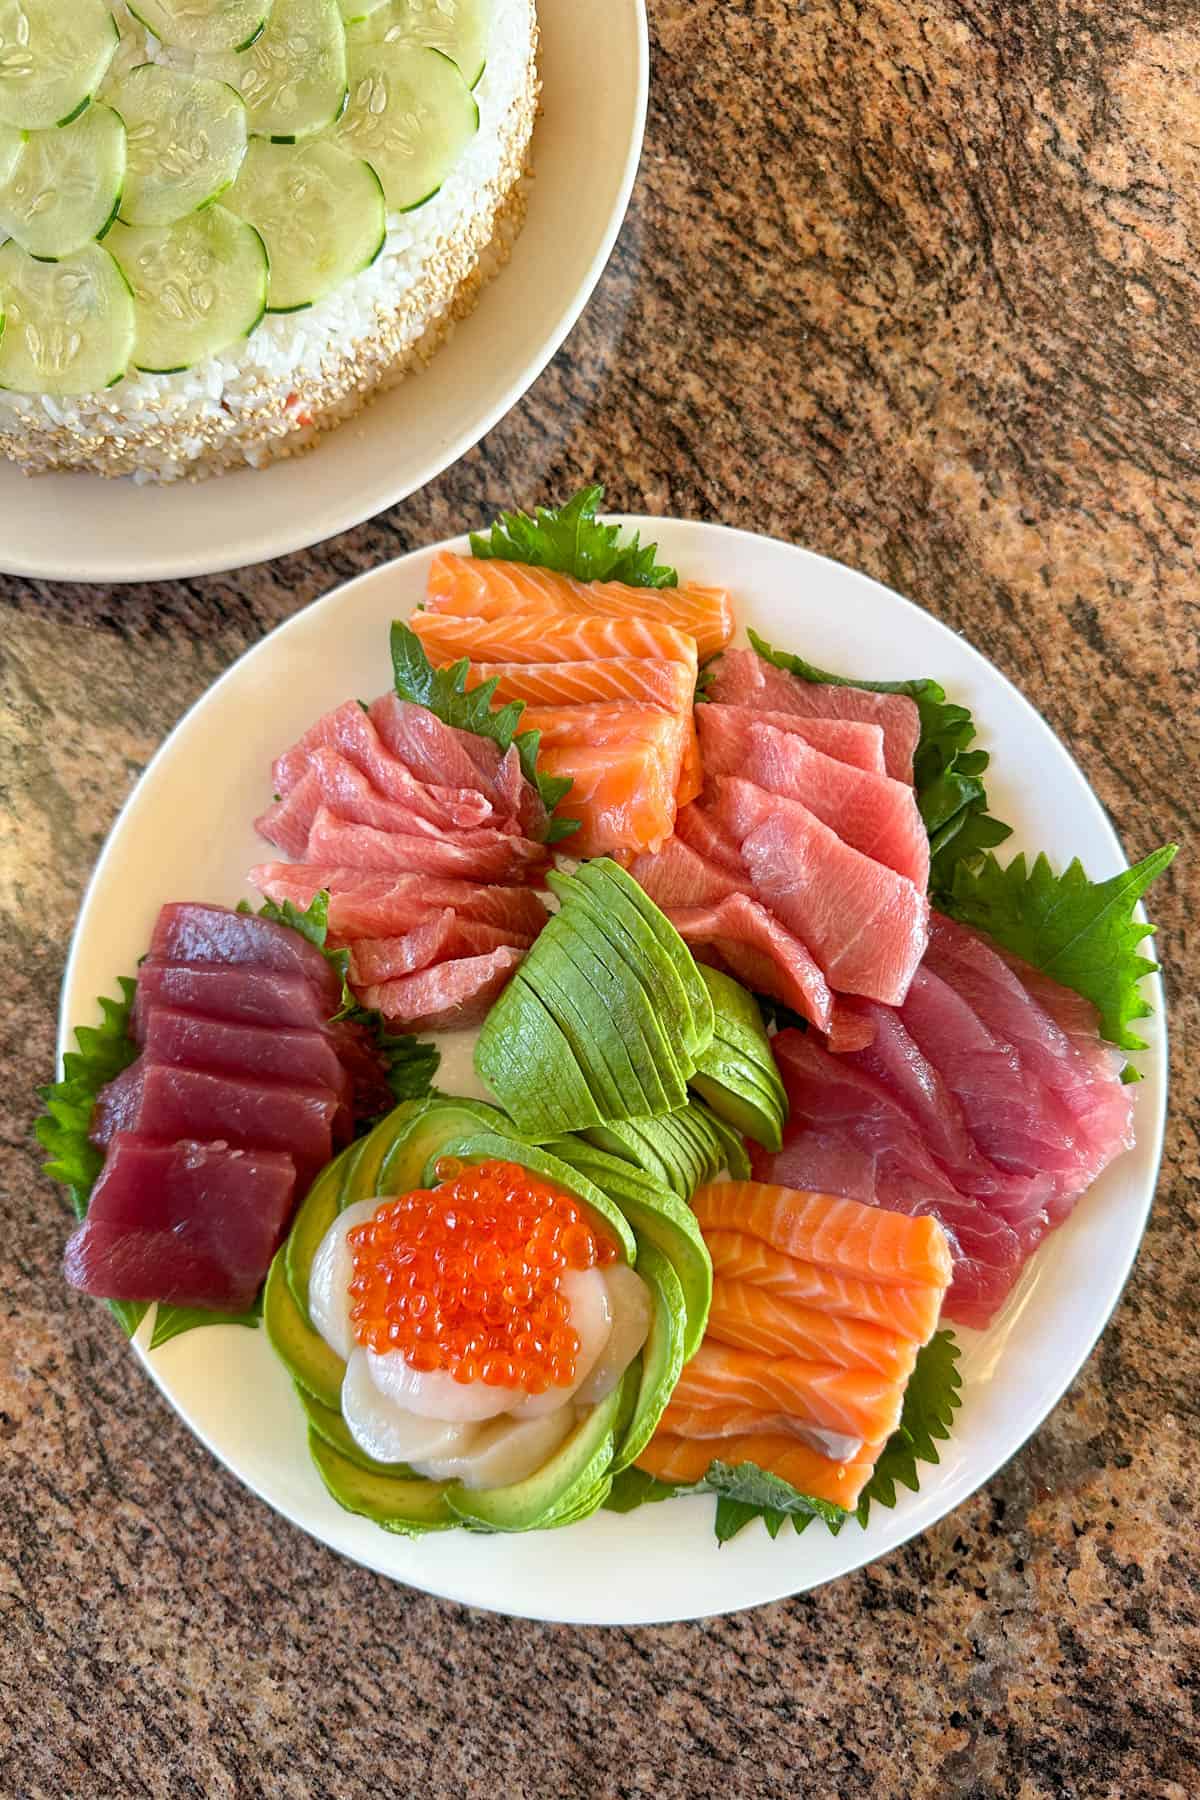
Then slice the cake into however many pieces you want. We cut the 8-inch cake into 8 pieces. Plate each cake slice. Then place a shiso leaf followed by a couple slices of each sashimi type on top of the cake slice. Place some of the avocado, scallop, and ikura on the side, next to the cake slice.
Serve with a small dipping dish of soy sauce and wasabi on the side. Eat (with chopsticks) and enjoy. We LOVE sushi cake ^_^
Sushi Cake Recipe

Sushi Cake
Ingredients
Sushi Rice
- 6 cups fresh cooked rice (2 cups uncooked rice = 6 cups cooked rice) ideally Japanese short grain rice
- ½ cup sushi vinegar
- 3 tablespoons sugar
- 1 tablespoon salt
Sushi Cake
- 2 tablespoons white sesame seeds
- 10 shiso leaves
- 1 Japanese cucumber or any other seedless cucumber
- 1 avocado
- ½ pound imitation crab salad
- ½ pound ahi poke
- ¼ pound ikura
- ½ pound scallop sashimi
- ½ pound salmon sashimi
- ½ pound ahi sashimi
- ½ pound chutoro sashimi
Instructions
- Prepare the rice:Once the rice is done cooking in the rice cooker, open the rice cooker and gently fluff the rice. Let cool for 5 minutes.During those 5 minutes, mix the sushi vinegar, sugar, and salt together until dissolved. Then pour the mixture over the warm rice and gently mix with a rice paddle. Set aside and let cool while you prepare the rest of the ingredients.
- Prepare the fish and seafood:Slice the scallops and set aside. Then slice the ahi, salmon, and chutoro. Place everything on a plate. Cover with plastic wrap and store in the refrigerator.
- Prepare the ahi poke and imitation crab salad (store bought):Poke and crab salad usually come in large pieces/chunks but because we are going to spread this over the rice layers, we want it in smaller pieces. Use a knife and finely chop the poke and salad, then set aside.
- Prepare the shiso, cucumber, and avocado:Wash and pat dry the shiso leaves. Thinly slice the cucumber.You can also slice the avocado at this time, but now I like to do that last minute (right before I place the avocado on the sushi cake) to keep the avocado extra fresh and green.
- Time to assemble the sushi cake! Prepare the pan:Wash and dry any 8-inch pan. Use large piece of plastic wrap to cover the interior of the pan. Make sure to use a large enough piece of plastic wrap so that it hangs over the sides of the pan - this will make it easier to remove later.
- Add rice layer 1:Use a rice paddle to scoop about a third of the rice. Gently pat it into the pan. You don't want to smash the rice into the pan, but you also want the rice to be pressed down firmly enough so that it doesn't fall apart later. This first layer will become the "top" of the sushi cake when we flip it over layer so you want to make it nice and even.
- Add the ahi poke layer:Use a spoon to add all the ahi poke in a single and even layer. I don't spread all the way to the very edge because I like to leave the edges "clean." It looks nicer from a side view when serving the finished sushi cake.
- Add rice layer 2: Add a second layer of rice.
- Add the imitation crab salad layer:Use a spoon to add all the imitation crab salad in a single and even layer.
- Add rice layer 3: Add a third layer of rice.
- Press and flip:You should have enough layers to reach the top of the pan (I often go over the top of the pan little but it's ok). Use the rice paddle to give everything a gentle firm pat (we don't want things falling apart).Then place a large serving plate on top of the pan. Slowly flip it over and remove the pan. Then remove the plastic wrap. Now you have completed the foundation of the cake.
- Add the sesame seeds:Use your hands to lightly press the sesame seeds around the sides of the sushi cake. You can use as little or as much as you like. White sesame seeds are the default, but if you have black sesame seeds it's fun to mix both colors.
- Add the cucumber layer: Cover the surface of the sushi cake with a layer of sliced cucumbers.
- Add the sashimi:Now this part is really up to your own "style." But I will tell you how I like to do it. First I take one shiso leaf and place it on top of the cucumber layer. Then add 3-5 slices of ahi sashimi on top of the shiso.Then I take a second shiso leaf and repeat with the salmon. Then repeat again with the chutoro.Keep repeating the shiso plus three fish until you form a full ring around the edge of the sushi cake. Leave the center part open so that you can place the avocado/scallop/ikura crown in the middle.
- Make the center sashimi "crown":Thinly slice the avocado and form a crown. Place it in the middle. Then layer in the sliced scallop sashimi. Then top with the ikura. You want enough ikura so that the orange really pops (the more ikura, the merrier!) But you don't want to cover the beautiful scallops, so arrange accordingly.
- The sushi cake is ready to serve! ^_^
- Here are tips on how to serve the cake:Remove the top (aka "frosting") layer of the sushi cake and place it on a plate. This includes all the sashimi, shiso leaves, avocado, ikura, etc.Then slice the cake into however many pieces you want. I cut the 8-inch cake into 8 pieces. Plate each cake slice. Then place a shiso leaf followed by a couple slices of each sashimi type on top of the cake slice. Place some of the avocado, scallop, and ikura on the side, right next to the cake slice.Serve with a small dipping dish of soy sauce and wasabi on the side. Eat (with chopsticks) and enjoy. We LOVE sushi cake.


Wow, I had never heard of sushi cake before. Such a creative and beautiful creation. I think I would love eating one of those too. Maybe the next time I am back in HNL, I will pick one up and take it as my contribution to our normal potluck dinner with my old time friends. Thanks for the information on this new and wonderful creation.
Hi Alan! Hope all is well! It's such a neat idea yeah?? I'm still in awe of how good it looks AND tastes. Hope your potluck friends love it 🙂
- Kathy